UNIX Time Stamp
UNIX time counts the number of seconds since an "epoch". epoch was defined as the beginning of 1970 GMT ie., January 1, 1970. This is very convenient for programs that work with time intervals: the difference between two UNIX time values is a real-time difference measured in seconds, within the accuracy of the local clock. This was standardized in POSIX
The Problem
At seven seconds past 03:14 AM on January 19, 2038 the counters on every Unix computer in the world will be full and will roll over to "0." Many computers assume the time as January 1, 1970. Because many computers store the number of seconds as a 32-bit signed integer, the Unix epoch is often said to last 231 seconds, thus ending at 03:14:07 AM January 19, 2038 (tuesday)
Storage Format & time_t
In POSIX conforming systems, the type "time_t" is used to represent times. It is an arithmetic type in C programming language. Even though there is no requirement that time_t be a 32-bit quantity, most systems define time_t as a signed 32-bit integer & many application programs may assume or store values in a 32-bit type. A signed 32-bit integer type can represent numbers ranging from -231 to 231 - 1. ie., -2,147,483,648 to 2,147,483,647. In this format, time_t will run out of positive integers 231-1 seconds (that is 24855 days, 3 hours, 14 minutes and 7 seconds) after the Epoch, in the year 2038 and thus cannot represent times beyond that point.
As a result of this, some applications written in C/C++ programming languages may then revert to 1 January 1970 as the current date, while others based on different implementation logic may revert to 13 December 1901, which is 1 January 1970 less 1031 seconds
Solution
Compiling time_t as a 64-bit signed integer will allow representation of all points in time 292 billion years before and after January 1, 1970. All new 64-bit native applications may not face "year 2038 rollover" problem
Suggested Reading:
"Bad days for software" http://www.spectrum.ieee.org/select/0998/date.html
Wednesday, 1 December 2004
Wednesday, 24 November 2004
UNIX: Terminology I
User Process
A user process is a running instance of some user program (which must have been resident in the filesystem somewhere, such as /bin/ls or /usr/dt/bin/dtmail)
Address Space
Each user process has its own unique address space so that one user process cannot directly violate the memory space of another. The valid ranges of virtual addresses within the address spaces of two distinct processes will often look similar (e.g., executable code normally starts at address 0x10000), but will be mapped by the kernel to different physical memory addresses
Segment
An address space is made up of a number of segments. Typical segment types for a user process are text (executable code), heap (global program data), shared library (mapped in at process creation time) and stack (used to store the processes main stack). You can see the segments comprising the address space for any process using /usr/proc/bin/pmap
32-bit Program
In a 32-bit program virtual memory addresses are formulated using 32-bits, so the addressable range is 0 to 2^32 - 1 - a range of 4GB. This means that a single 32-bit process can address up to 4GB of virtual memory. There was a time when 4GB was a lot of address space, but increasingly programs are finding the need to address more than this
64-bit Program
Similarly, a 64-bit program formulates virtual memory addresses in 64-bits and has an address range of 0 to 2^64 - 1. This is an absolutely vast range of addresses - we can map very large individual segments into a 64-bit address space and we can even leave very large "holes" between the segments
32-bit Kernel
A 32-bit kernel is a kernel that uses 32-bit addresses. Being a 32-bit program, a 32-bit kernel can use at most 4GB to store all its own executable code and data structures. Since the kernel is responsible for all aspects of the system, it must maintain enormous numbers of data structures (e.g., a structure to keep track of every process created in the system, a structure to manage every physical page of memory). As systems become bigger and more complex, the 4GB that a 32-bit kernel has available in which to store its data structures has become ever more crowded
64-bit Kernel
A 64-bit kernel, on the other hand, uses 64-bit addresses and can therefore address a vast amount of memory for storing its own data structures
User Thread
Originally a user process had just a single thread of control. Execution started at the main() function and traced subsequent code and function calls in a single path. To perform tasks in parallel, a process would fork() a child to perform some work
More recently user programs have become multithreaded multiple threads of control. Execution still starts at main() but the process can create additional threads of control through calls to an API. The resulting "user level threads" can perform tasks in parallel, and even run simultaneously in a multi-CPU system
A user process is, therefore, comprised of a number (perhaps only 1 in the single-threaded case) of user threads. These user threads all share the address space of the process within which they reside. Multithreaded applications
usually employ from two to several tens of threads, but some applications are also written to use hundreds or thousands of threads
Kernel Thread
Modern UNIX kernels are also multithreaded, meaning that we have multiple threads of control within the kernel. A typical kernel will have created hundreds or even thousands of kernel threads.
Some kernel threads exist only to support the system calls made by user-level threads. When a user process (i.e., some thread in that process) requires a service of the system (necessarily provided by the kernel) it performs a system call into the kernel, and one of the kernel threads created to support that process performs the requested service
The kernel threads that support a particular process also perform some transparent work on behalf of the process For example, if a process accesses an address in a page that has been paged out to swap this will generate a page fault. Handling this page fault (page in from swap) requires the kernels intervention, and the kernel thread supporting the user thread that "pagefaulted" will perform the necessary work - the user thread will later resume without even knowing that a pagefault took place
Some kernel threads are "pure" kernel threads. These don't perform services directly for user processes, but instead perform background and housekeeping tasks. Examples are pageout, fsflush and the kernel RPC threads
Stack Frame
In C every function that is called has a corresponding stack frame (except for so-called leaf functions where the compiler can sometimes optimize the stack frame away). This provides storage for the CPU registers in use in that function (mostly we'll work within the CPU registers themselves, but at times such as when switching to a new process to run or calling another function from within the current function we may need somewhere to store the current register values). The stack frame also provides storage for the local variables of the function
Not all stack frames are the same size - they vary depending on the number and size of local variables in the function. The minimum stack frame size (one which just provides storage for registers but no local variable storage) is usually less than 100 bytes
Stack
Abstractly, a "stack" is a linear list from which insertions and deletions are made from only one end
The stack for a given thread is a linear list of stack frames. As a function call is made a new stack frame is allocated and inserted at the bottom of the stack. When the function call returns (perhaps after having made further function calls) its stack frame is removed from the bottom of the stack
Stack frames that are logically adjacent in the stack (i.e., the stack frames for two functions one of which has called the other) are usually physically adjacent in virtual memory (the processor instructions that manipulate stack pointers simply increment or decrement the current stack pointer). This means that if we have an area of memory, say one 8K page, allocated to hold a particular thread's stack and have the two adjacent pages (one above and one below this stack page) in use for other purposes that we cannot easily grow the stack outside of the 8K page it started in
User Stack
For a single-threaded process the stack resides within the stack segment of the process address space. The stack segment usually starts out reasonably small (8K) and the initial stack frame (for main) is allocated at the top of this
If during process execution the stack grows to the extent that we will "drop off" the bottom of the stack segment (remember that consecutive stack frames are usually allocated in adjacent memory ranges) the kernel can catch this access and quickly increase the stack segment size (provided no ulimit has been exceeded)
In order to allow for the possibility of stack segment growth, the virtual address range of the initial stack segment is chosen so as to have a virtual address space "hole" below it into which we can grow the stack segment. If instead the initial stack segment were placed immediately adjacent to another address space segment we would not be able to grow the stack segment
For multithreaded user processes, each thread is allocated its own stack at the time it is created (the process starts with one thread and can create others from there). Unlike the single-threaded case, we are unable to dynamically grow the stacks of these threads. The reason is quite simple - leaving the necessary virtual address
space "hole" below each allocated stack into which we could grow can soon exhaust the 32-bit address space (4GB) that a 32-bit process can access
Kernel Stack
All the kernel threads within the kernel share the same address space (just like all user threads within a single multithreaded process share an address space)
Each kernel thread is allocated its own stack at the time it is created. It immediately becomes obvious that it will be difficult to space these stacks in a 32-bit address space in such a way that there is room for growth beneath
every stack while still leaving much room for the kernel to store other material
"Pure" kernel threads always run on their allocated (kernel) stack. User threads run on their allocated stack until such time as they make a system call or until the kernel handles something like a pagefault on their behalf. At this point we switch to running the kernel thread using its allocated stack. When the system call or whatever is complete we return to running the user thread on its stack
source:
sunsolve.sun.com documents
Thursday, 18 November 2004
C++: Name Mangling
When C++ compilers compile a C++ program, it encodes all function names and

certain other identifiers to include type and scoping information. This encoding

process is called name mangling. Linker uses these mangled names to ensure

type-safe linkage. These mangled names appear in the object files and final

executable file.


What's a symbol?

In every C++ program/library/object file, all non-static functions are represented

in the binary file as symbols. These symbols are special text strings that uniquely

identify a function in the program, library or object file


The Need for Name Mangling:

C language programs does not use name mangling, because in C no two non-static

functions can have the same name. i.e., the symbol name is the same as the

function name: the symbol of myfunc will be myfunc


Because C++ allows overloading (different functions with the same name but

different number of arguments) and has many features C does not, like classes,

member functions, exception specifications — it is not possible to simply use the

function name as the symbol name. To solve that, C++ uses name mangling, which

encodes the function name and all the necessary information (like the number

and size of the arguments) into some special string which only the compiler

knows about


eg.,

bpte4500s001:/sunbuild1/giri/testcases/% nm hide.o


hide.o:


[Index]   Value      Size    Type  Bind  Other Shndx   Name

[3]     |        16|      56|FUNC |GLOB |3    |2      |__1cKCRectangleKset_values6Mii_v_

[4]     |         0|       0|NOTY |GLOB |0    |ABS    |__fsr_init_value

[1]     |         0|       0|FILE |LOCL |0    |ABS    |hide.cpp

[2]     |        88|      32|FUNC |GLOB |2    |2      |main


"__1cKCRectangleKset_values6Mii_v_" is the mangled name


But this kind of scheme is undesirable for the developers because the names

are difficult to read & debug


Two utilities are available with Sun Studio C/C++ compiler collection to convert

the mangled names to their original source code names:

1)  c++filt &

2) dem


C++filt is a filter that demangles (decodes) mangled names.

bpte4500s001% echo __1cKCRectangleKset_values6Mii_v_ | c++filt

void CRectangle::set_values(int,int)


"dem" is another utility to demangle C++ names

bpte4500s001% dem __1cKCRectangleKset_values6Mii_v_

__1cKCRectangleKset_values6Mii_v_ == void CRectangle::set_values(int,int)


Note:

C++ standard does not define how names have to be mangled; thus every compiler

mangles names in its own way. Some compilers even change their name mangling

algorithm between different versions. This could be a problem if the developers

hack & rely on how compiler mangles the C++ symbols, as the same algorithm may

not work with the next version of C++ compiler
Monday, 15 November 2004
UNIX/C: cscope - an interactive program examiner
cscope is an interactive program that locates specified elements of code in C,

C++, lex, or yacc source files. cscope  is a very useful utility to browse through

the source code tree of a large project. It is a text-mode screen-oriented utility.


When cscope is called for a set of C, C++, lex, or yacc source files, it builds a

symbol cross-reference table for the functions, function calls, macros, variables,

and preprocessor symbols in those files. You can then query that table about the

locations of symbols you specify.


At First, cscope presents a menu and asks you to choose the type of search you

would like to  perform. You may, for instance, want cscope to find all the

functions that call a specified function. When it completes the search, cscope

prints a list.  Each list entry contains the name of the file, the number of the line,

and the text of the line in which cscope has found the specified code. In our case,

the list also includes the names of the functions that call the specified function.

We now have the option of requesting another search or examining one of the

listed lines with the editor. If we choose the latter, cscope invokes the editor (vi)

for the file in which the line appears, with the cursor on that line. We can now

view the code in context and, if we wish, edit the file as any other file. By simply

using vi editor's edit keys we can either navigate through the code or return back

to the menu to request a new search.


Lets try building symbol cross-reference table & search for some symbols using

cscope


bpte4500s001:/sunbuild1/giri/testcases/cscope/%ls

hidden.cpp    hidden.h      hide.cpp      htest.cpp     test.h

testcase.cpp  x.cpp         x.h


bpte4500s001:/sunbuild1/giri/testcases/cscope/%which cscope

/home/sundev/S1S9/SUNWspro/bin/cscope

^^^^

cscope is part of Sun Studio Compiler Collection


By default, cscope builds a symbol cross-reference table for all the C, C++, lex,

and yacc source files in the current directory, and for any included header files in

the current directory or the standard place. So, if all the source files for the

program to be browsed are in the current directory, and if its header files are

there or in the standard place, invoke cscope without arguments


bpte4500s001:/sunbuild1/giri/testcases/cscope/%cscope

---------------------------------------------------------------------

cscope                                       Press the ? key for help


Find this C symbol:

Find this global definition:

Find functions called by this function:

Find functions calling this function:

Find this text string:

Change this text string:

Find this egrep pattern:

Find this file:

Find files #including this file:

---------------------------------------------------------------------


cscope builds the symbol cross-reference table the first time it is used on the

source files for the program to be browsed. By default, the table is stored in the

file "cscope.out" in the current directory. On a subsequent invocation, cscope

rebuilds the cross-reference only if a source file has been modified or the list of

source files is different


bpte4500s001:/sunbuild1/giri/testcases/cscope/%ls

cscope.out    hidden.cpp    hidden.h      hide.cpp

htest.cpp     test.h        testcase.cpp  x.cpp         x.h


bpte4500s001:/sunbuild1/giri/testcases/cscope/%file cscope.out

cscope.out:     data


bpte4500s001:/sunbuild1/giri/testcases/cscope/%cat hidden.h

__declspec(dllexport) char *lastname(char *);

//char *lastname(char *);

__declspec(dllexport)

int agefunc();

__declspec(dllexport)

char firstchar(char *);


Now lets try to locate the function "lastname" using cscope


---------------------------------------------------------------------

C symbol: lastname


File     Function   Line

1 hidden.h __declspec 1 __declspec(dllexport) char *lastname(char *);


Find this C symbol:

Find this global definition:

Find functions called by this function:

Find functions calling this function:

Find this text string:

Change this text string:

Find this egrep pattern:

Find this file:

Find files #including this file:

---------------------------------------------------------------------


After cscope shows you the results of a successful search, you have several

options. You may want to change one of the lines or examine the code

surrounding it in the editor. Or, if cscope has found so many lines that a list of

them does not fit on the screen at once, you may want to look at the next part of

the list.


If you want to open up "hidden.h", just press 1; it opens up "hidden.h" in vi

editor. If more than one file has the designated symbol, we just need to press

the number that is besides the file name which we want to edit. If the search

yields more results and if all the results doesn't fit in a single screen, we need

to press "space bar" to go to the next screen. To go back to the previous screen,

we need to press "--"


NOTE:

If the source code of a project is spread over different directories we need to get

the list of files (with the path) and save the list in a file called "cscope.files".

Then run cscope to build the symbol cross-reference table & to show the menu.

Once the symbol cross-reference table is ready & if there are no changes in the

source code, invoke cscope with "-d" flag from subsequent executions. "-d"

instructs cscope not to update the cross-reference


bpte4500s001:/sunbuild1/giri/testcases/cscope/%ls -ld *

drwxrwxr-x   2 build    engr         512 Nov 15 16:44 hidden

-rw-r--r--   1 build    engr          79 Nov 15 16:18 htest.cpp

drwxrwxr-x   2 build    engr         512 Nov 15 16:44 test

drwxrwxr-x   2 build    engr         512 Nov 15 16:44 x


bpte4500s001:/sunbuild1/giri/testcases/cscope/%ls -lR *

-rw-r--r--   1 build    engr          79 Nov 15 16:18 htest.cpp


hidden:

total 6

-rw-r--r--   1 build    engr         320 Nov 15 16:18 hidden.cpp

-rw-r--r--   1 build    engr         155 Nov 15 16:18 hidden.h

-rw-r--r--   1 build    engr         358 Nov 15 16:18 hide.cpp


test:

total 4

-rw-rw-r--   1 build    engr          42 Nov 15 16:18 test.h

-rw-rw-r--   1 build    engr         354 Nov 15 16:18 testcase.cpp


x:

total 4

-rw-r--r--   1 build    engr          60 Nov 15 16:18 x.cpp

-rw-r--r--   1 build    engr          47 Nov 15 16:18 x.h


bpte4500s001:/sunbuild1/giri/testcases/cscope/%cscope

cscope: no source files found


bpte4500s001:/sunbuild1/giri/testcases/cscope/%find . -name "*" > cscope.files


bpte4500s001:/sunbuild1/giri/testcases/cscope/%ls

cscope.files  hidden        htest.cpp     test          x


bpte4500s001:/sunbuild1/giri/testcases/cscope/%cscope

(.. skipped cscope menu ..)


bpte4500s001:/sunbuild1/giri/testcases/cscope/%ls

cscope.files  hidden        test

cscope.out    htest.cpp     x


Note:

If cscope throws an error message like "Input string too long, limit 50251",

run truss on cscope and observe the last few lines to find the culprit and remove

it from cscope.files to let cscope continue building the symbol database


Courtesy:

Sun Microsystems, Sun Studio 9: C User's Guide
Thursday, 11 November 2004
Sun C/C++: Installed Components & Version#s
bpte4500s001:/sunbuild2/web/dump/%which version

/sunbuild3/s1s9/SUNWspro/prod/bin/version


bpte4500s001:/sunbuild2/web/dump/%version

Machine hardware:   sun4u

OS version:         5.8

Processor type:     sparc

Hardware:           SUNW,Ultra-Enterprise


The following components are installed on your system:


Sun Studio 9

      Sun Studio 9 C Compiler

      Sun Studio 9 C++ Compiler

      Sun Studio 9 Tools.h++ 7.1

      Sun Studio 9 C++ Standard 64-bit Class Library

      Sun Studio 9 Garbage Collector

      Sun Studio 9 Fortran 95

      Sun Studio 9 Debugging Tools (including dbx)

      Sun Studio 9 Debugger GUI

      Sun Studio 9 Performance Tools (including collect, ...)

      Sun Studio 9 X-Designer

      Sun Studio 9 VIM editor

      Sun Studio 9 XEmacs editor

      Sun Studio 9 Native Connector Tool

      Sun Studio 9 LockLint

      Sun Studio 9 Building Software (including dmake)

      Sun Studio 9 Documentation Set


version of "/sunbuild3/s1s9/SUNWspro/prod/bin/../../bin/cc": Sun C 5.6 2004/06/02

version of "/sunbuild3/s1s9/SUNWspro/prod/bin/../../bin/CC": Sun C++ 5.6 2004/06/02

version of "/sunbuild3/s1s9/SUNWspro/prod/bin/../../bin/f90": Sun Fortran 95 8.0 2004/06/02

version of "/sunbuild3/s1s9/SUNWspro/prod/bin/../../bin/dbx": Sun Dbx Debugger 7.3 2004/06/02

version of "/sunbuild3/s1s9/SUNWspro/prod/bin/../../bin/analyzer": Sun Performance Analyzer 7.3 2004/06/02

version of "/sunbuild3/s1s9/SUNWspro/prod/bin/../../bin/dmake": Sun Distributed Make 7.5 2004/06/02
Monday, 8 November 2004
JDS: Linux & Sony DSC-V1/W1 Digital Camera
summary:


switch the camera in USB PTP (Picture Transfer Protocol) mode and then run

"gtkam" application


1) Setup the camera to enable PTP by default


      i) unplug USB cables (if any) from camera

     ii) turn the dial to "setup"

    iii) using arrow keys navigate to USB connect & set the mode to

        "PTP" ("normal" is the default)

     iv) exit the setup

Quick test:

     i) plug-in the USB cable from Camera to computer

    ii) turn on the camera <= it should read "USB Mode - PTP". If it shows

        "USB Mode - Normal", we have to go back to step (1) and enable

        PTP


2) Run "gtkam" on Linux machine


    i) Install the latest versions of libgphoto2, gPhoto2, and gtkam on

        your machine, if not installed already. JDS install gtkam &

        the dependencies (libraries) by default, unless you choose

        not to install during installation of OS


    URL for gtkam, gPhoto2 & libgphoto2: http://www.gphoto.org/download/


    ii) Run "gtkam" by typing gtkam& in a terminal window and go to the

        Camera -> Add Camera. Select "Sony DSC-V1" or "Sony DSC-W1"

        camera from the list of cameras and press OK


    iii) It should quickly initialize the camera and then add it to the

        camera listing on the left in the main window of gtkam. Browse

        through the tree of the camera and select any folders that you

        have setup on the camera


    iv) You can right click on any picture or movie and select Save or select

        multiple pictures and movies and goto the File menu and select

        Save selected Photos or use Ctrl+S as a shortcut to save the

        photos and movies to your hard drive


    v)  Play with options "Save photos, Save raw data, Save audio data,

        Save thumbnails, & Save EXIF data" and choose the format in

        which you want to save the data from Camera


3) Other recommended softwares


Probably want to add many more things to your Linux system to deal with all of

the data you will downloading from your camera. Following are some of the

recommended softwares:


    * Eye of Gnome image viewer for looking at all of your photos

        URL: http://www.gnome.org/gnome-office/eog.shtml


    * GIMP image editing software to edit and manipulate all of your photos

        (e.g. remove blemishes, take out red eye, etc.,)

        URL: http://www.gimp.org/downloads/


        ** Red Eye Removal tutorial for GIMP

            URL: http://www.gimp.org/


        ** EXIF Browser Plug-in for GIMP so that you can view all of the

            important information stored in your photos (e.g. date,

            time, resolution, camera settings, etc.). This will need

            the libexif library to be install as well


            EXIF Browser Plug-in: http://registry.gimp.org/plugin?id=4153

            libexif library: http://sourceforge.net/projects/libexif


    * jhead is a console utility that will allow you to view all of the detailed

        EXIF information saved to your photos by the camera

        URL: http://www.sentex.net/~mwandel/jhead/


    * MPlayer to play any of the movies created with your camera. This will need

        a few things to be installed first: among other things are the LAME

        libraries


        MPlayer: http://www.mplayerhq.hu/homepage/dload.html

        LAME libraries: http://lame.sourceforge.net/download/download.html


Acknowledgements:

    John Wyles
Wednesday, 27 October 2004
C/C++ & Object Oriented Jargon - 1
Template Class Vs Class Template
Template class: A generic definition or a parameterized class not instantiated until the client provides the needed information; jargon for plain templates
Class template: A class template specifies how individual classes can be constructed much like the way a class specifies how individual objects can be constructed; jargon for plain classes
Dangling pointer
A dangling pointer arises when you use the address of an object after its lifetime is over. This may occur in situations like returning addresses of the automatic variables from a function or using the address of the memory block after it is freed
Message Vs Method
Message
- Objects communicate by sending messages to each other
- A message is sent to invoke a method
A class that has no functionality of its own. Its member functions hide the use of a third party software component or an object with the non-compatible interface or a non-object-oriented implementation
Class Invariant
A class invariant is a condition that defines all valid states for an object. It is a logical condition to ensure the correct working of a class. Class invariants must hold when an object is created, and they must be preserved under all operations of the class. In particular all class invariants are
both preconditions and post-conditions for all operations or member functions of the class
Stack Unwinding
It is a process during exception handling when the destructor is called for all local objects between the place where the exception was thrown and where it is caught
Pre-condition/Post-condition to a member function
Precondition: A precondition is a condition that must be true on entry to a member function. A class is used correctly if preconditions are never false. An operation is not responsible for doing anything sensible if its precondition fails to hold. For example, the interface invariants of stack class say nothing about pushing yet another element on a stack that is already full. We say that isful() is a precondition of the push operation
Post-condition: A post-condition is a condition that must be true on exit from a member function if the precondition was valid on entry to that function. A class is implemented correctly if post-conditions are never false. For example, after pushing an element on the stack, we know that isempty() must necessarily hold. This is a post-condition of the push operation
Container Class
A container class is a class that is used to hold objects in memory or external storage. A container class acts as a generic holder. A container class has a predefined behavior and a well-known interface. A container class is a supporting class whose purpose is to hide the topology used for maintaining the list of objects in memory. When a container class contains a group of mixed objects, the container is called a heterogeneous container; when the container is holding a group of objects that are all the same, the container is called a homogeneous container.
Polymorphism
Polymorphism refers to the ability to have more than one method with the same signature in an inheritance hierarchy. The correct method is invoked at run-time based on the context (object) on which the method is invoked. Polymorphism allows for a generic use of method names while providing specialized implementations for them
Function Overloading Vs Function Overriding
Overloading is a method that allows defining multiple member functions with the same name but different signatures. The compiler will pick the correct function based on the signature. Overriding is a method that allows the derived class to redefine the behavior of member functions which the derived class inherits from a base class. The signatures of both base class member function and derived class member function are the same; however, the implementation and, therefore, the behavior will differ
Template class: A generic definition or a parameterized class not instantiated until the client provides the needed information; jargon for plain templates
Class template: A class template specifies how individual classes can be constructed much like the way a class specifies how individual objects can be constructed; jargon for plain classes
Dangling pointer
A dangling pointer arises when you use the address of an object after its lifetime is over. This may occur in situations like returning addresses of the automatic variables from a function or using the address of the memory block after it is freed
Message Vs Method
Message
- Objects communicate by sending messages to each other
- A message is sent to invoke a method
Method
- Provides response to a message
- It is an implementation of an operation
A class that has no functionality of its own. Its member functions hide the use of a third party software component or an object with the non-compatible interface or a non-object-oriented implementation
Class Invariant
A class invariant is a condition that defines all valid states for an object. It is a logical condition to ensure the correct working of a class. Class invariants must hold when an object is created, and they must be preserved under all operations of the class. In particular all class invariants are
both preconditions and post-conditions for all operations or member functions of the class
Stack Unwinding
It is a process during exception handling when the destructor is called for all local objects between the place where the exception was thrown and where it is caught
Pre-condition/Post-condition to a member function
Precondition: A precondition is a condition that must be true on entry to a member function. A class is used correctly if preconditions are never false. An operation is not responsible for doing anything sensible if its precondition fails to hold. For example, the interface invariants of stack class say nothing about pushing yet another element on a stack that is already full. We say that isful() is a precondition of the push operation
Post-condition: A post-condition is a condition that must be true on exit from a member function if the precondition was valid on entry to that function. A class is implemented correctly if post-conditions are never false. For example, after pushing an element on the stack, we know that isempty() must necessarily hold. This is a post-condition of the push operation
Container Class
A container class is a class that is used to hold objects in memory or external storage. A container class acts as a generic holder. A container class has a predefined behavior and a well-known interface. A container class is a supporting class whose purpose is to hide the topology used for maintaining the list of objects in memory. When a container class contains a group of mixed objects, the container is called a heterogeneous container; when the container is holding a group of objects that are all the same, the container is called a homogeneous container.
Polymorphism
Polymorphism refers to the ability to have more than one method with the same signature in an inheritance hierarchy. The correct method is invoked at run-time based on the context (object) on which the method is invoked. Polymorphism allows for a generic use of method names while providing specialized implementations for them
Function Overloading Vs Function Overriding
Overloading is a method that allows defining multiple member functions with the same name but different signatures. The compiler will pick the correct function based on the signature. Overriding is a method that allows the derived class to redefine the behavior of member functions which the derived class inherits from a base class. The signatures of both base class member function and derived class member function are the same; however, the implementation and, therefore, the behavior will differ
Friday, 22 October 2004
Solaris: Resetting Forgotten Root Password
Need physical or remote console access to the system to use these steps:
# ed /tmp/mnt/etc/shadow
1p
s/:.............:/::/ (Note: there are 13 dots in the second field)
1p
w
q
- Press Stop-A on the console or Ctrl-] and send brk from a remote console connection to access the Open Boot Prompt (OBP)
- Insert a bootable Solaris CD and boot into single-user mode with boot cdrom -s
- Make a mount point within the /tmp file system by typing mkdir /tmp/mnt
- Mount the root partition of the boot disk in /tmp/mnt.
ex. mount /dev/dsk/c0t0d0s0 /tmp/mnt - Edit /etc/shadow with vi /tmp/mnt/etc/shadow
- Remove the encrypted part of the root password (the second field; fields are separated by colons), save, and exit
- Unmount the file system with umount /tmp/mnt
- Reboot the system and assign a new password at a shell prompt with the passwd command
# ed /tmp/mnt/etc/shadow
1p
s/:.............:/::/ (Note: there are 13 dots in the second field)
1p
w
q
Tuesday, 19 October 2004
C++: Virtual Function
A virtual function allows derived classes to replace the implementation provided by the base class. The compiler makes sure the replacement is always called whenever the object in question is actually of the derived class, even if the object is accessed by a base pointer rather than a derived pointer. This allows algorithms in the base class to be replaced in the derived class, even if users don't know about the derived class.
The derived class can either fully replace (override) the base class member function, or the derived class can partially replace (augment) the base class member function. The latter is accomplished by having the derived class member function call the base class member function, if desired
Monday, 18 October 2004
UNIX/Linux: File Permissions (chmod)
A file's permissions are also known as its 'mode'; so to change them we need to use the 'chmod' command (change mode). There are two ways of specifying the new permissions using chmod: symbolic and absolute.
Absolute Mode
Absolute mode is the one with the numbers. You can use simple arithmetic to arrive at the permission you are looking for. Consider:
[techno@Govinda]$ chmod 600 myscript
[techno@Govinda]$ ls -l myscript
-rw------- 1 techno users 192 Feb 6 14:55 myscript
Now let us imagine that we need some help with our script, so we make it available to our programmer friend, who just happens to belong to a group called 'web'. We need to change the group, and change the group permissions:
[techno@Govinda]$ chgrp web myscript
[techno@Govinda]$ chmod 660 myscript
[techno@Govinda]$ ls -l myscript
-rw-rw---- 1 techno web 192 Feb 6 14:55 myscript
Our script is now almost done, and we want to test it. We need it to be executable:
[techno@Govinda]$ chmod 770 myscript
[techno@Govinda]$ ls -l myscript
-rwxrwx--- 1 techno web 192 Feb 6 14:55 myscript
Our script is now perfect. We are going to make the script available for all users to run, and we want them to be able to see our handywork so we'll let everybody read and execute it. We don't want users changing it however, so they don't get write permission:
[techno@Govinda]$ chmod 775 myscript
[techno@Govinda]$ ls -l myscript
-rwxrwxr-x 1 techno web 192 Feb 6 14:55 myscript
SETUID
Normally, when a program is run it inherits all the rights/restrictions of the user that executed it. if a user can't read /var/log/messages, then neither can any program/script executed by that user. There is a way around this, we again use the chmod command but add a '4' at the beginning of the permission string, example:
chmod 4755 myscript
this would execute 'myscript' with the permissions of the files owner(such as root, if the file is own by root),and not the normal user executing 'myscript'. As you can imagine, this should be used sparingly if at all, as it defeats the normal permission structure,and can lead to security issues.
SETGID
The setgid bit works the same way, except instead of applying to the files owner, it is applied to the files group setting. the chmod command is used again prefixing a '2' as the first digit.
chmod 2755 myscript
Relative Mode
As the name implies, relative mode only changes permissions relative to the current permissions. That is, you can add or remove permissions from the existing ones. The format is pretty much the same as absolute mode: 'chmod [new_mode] file'. It is only the mode that is different.
We have three parts, which for lack of better terms, are '[entity][operator][permissions]'. The entities describe who gets the permissions. They are:
* 'u': user, the file's owner
* 'g': group, the file's group
* 'o': other, everybody else
* 'a': all, all three together
The operators decide whether we add, remove, or emulate absolute mode (ie: describe permissions from scratch). They are:
* '+' : add permissions
* '-': remove permissions
* '=': emulate absolute mode
The permissions we have seen already, they are nothing new:
* 'r' : read permission
* 'w': write permission
* 'x': execute permission
There are actually quite a few more options available, but they should not be necessary for casual use. Perhaps some more examples are in order.
chmod a+x filename # adds execute permissions to all
chmod u+x filename # adds execute permissions to the file's owner
chmod ug+w filename # adds write permissions to the file's owner and group
chmod o-rwx filename # removes read, write, and execute permissions from other
chmod a=rx filename # creates a 555 permission from scratch
As you can see pretty much any combination is valid as long as you follow the '[entity][operator][permissions]' formula.
THE STICKY BIT
UNIX/Linux directory access permissions say that if a user has write permissions on a directory, they can rename or remove files there,even if the files don't belong to them. When the owner of the directory sets the sticky bit, renames/removals are only allowed by the files owner, the directories owner and the root user.
chmod +t /tmp # to set the sticky bit
chmod -t /tmp # to remove the sticky bit
or
chmod 1755 /tmp # prefix a '1' to set the sticky bit
Setting the sticky bit on files was once used to force a copy of the file to stay in swap space, in an attempt to speed execution the next time the file was used. This hasn't been used in quite some time, due to advances in memory management. You can still set the sticky bit on a file, but the kernel will just ignore it.
Reference:
linuxquestions.org
Absolute Mode
Absolute mode is the one with the numbers. You can use simple arithmetic to arrive at the permission you are looking for. Consider:
---------------------------------------------------------------------------So just add the appropriate mode numbers to arrive at the desired permission. It may be easier to consider each entity as a single digit, in the usual order (owner group other). As always, this theory is best understand with some examples. Let's imagine a hypothetical file named 'myscript'. 'myscript' is a shell script that we are writing that performs a useful function. When we first create it we don't want others to mess around with it, so we set some restrictive permissions while writing it:
| owner | group | everyone |
---------------------------------------------------------------------------
| read | write | execute | read | write | execute | read | write | execute |
---------------------------------------------------------------------------
| 400 | 200 | 100 | 40 | 20 | 10 | 4 | 2 | 1 |
-----------------------------------------------------------------------------
[techno@Govinda]$ chmod 600 myscript
[techno@Govinda]$ ls -l myscript
-rw------- 1 techno users 192 Feb 6 14:55 myscript
Now let us imagine that we need some help with our script, so we make it available to our programmer friend, who just happens to belong to a group called 'web'. We need to change the group, and change the group permissions:
[techno@Govinda]$ chgrp web myscript
[techno@Govinda]$ chmod 660 myscript
[techno@Govinda]$ ls -l myscript
-rw-rw---- 1 techno web 192 Feb 6 14:55 myscript
Our script is now almost done, and we want to test it. We need it to be executable:
[techno@Govinda]$ chmod 770 myscript
[techno@Govinda]$ ls -l myscript
-rwxrwx--- 1 techno web 192 Feb 6 14:55 myscript
Our script is now perfect. We are going to make the script available for all users to run, and we want them to be able to see our handywork so we'll let everybody read and execute it. We don't want users changing it however, so they don't get write permission:
[techno@Govinda]$ chmod 775 myscript
[techno@Govinda]$ ls -l myscript
-rwxrwxr-x 1 techno web 192 Feb 6 14:55 myscript
SETUID
Normally, when a program is run it inherits all the rights/restrictions of the user that executed it. if a user can't read /var/log/messages, then neither can any program/script executed by that user. There is a way around this, we again use the chmod command but add a '4' at the beginning of the permission string, example:
chmod 4755 myscript
this would execute 'myscript' with the permissions of the files owner(such as root, if the file is own by root),and not the normal user executing 'myscript'. As you can imagine, this should be used sparingly if at all, as it defeats the normal permission structure,and can lead to security issues.
SETGID
The setgid bit works the same way, except instead of applying to the files owner, it is applied to the files group setting. the chmod command is used again prefixing a '2' as the first digit.
chmod 2755 myscript
Relative Mode
As the name implies, relative mode only changes permissions relative to the current permissions. That is, you can add or remove permissions from the existing ones. The format is pretty much the same as absolute mode: 'chmod [new_mode] file'. It is only the mode that is different.
We have three parts, which for lack of better terms, are '[entity][operator][permissions]'. The entities describe who gets the permissions. They are:
* 'u': user, the file's owner
* 'g': group, the file's group
* 'o': other, everybody else
* 'a': all, all three together
The operators decide whether we add, remove, or emulate absolute mode (ie: describe permissions from scratch). They are:
* '+' : add permissions
* '-': remove permissions
* '=': emulate absolute mode
The permissions we have seen already, they are nothing new:
* 'r' : read permission
* 'w': write permission
* 'x': execute permission
There are actually quite a few more options available, but they should not be necessary for casual use. Perhaps some more examples are in order.
chmod a+x filename # adds execute permissions to all
chmod u+x filename # adds execute permissions to the file's owner
chmod ug+w filename # adds write permissions to the file's owner and group
chmod o-rwx filename # removes read, write, and execute permissions from other
chmod a=rx filename # creates a 555 permission from scratch
As you can see pretty much any combination is valid as long as you follow the '[entity][operator][permissions]' formula.
THE STICKY BIT
UNIX/Linux directory access permissions say that if a user has write permissions on a directory, they can rename or remove files there,even if the files don't belong to them. When the owner of the directory sets the sticky bit, renames/removals are only allowed by the files owner, the directories owner and the root user.
chmod +t /tmp # to set the sticky bit
chmod -t /tmp # to remove the sticky bit
or
chmod 1755 /tmp # prefix a '1' to set the sticky bit
Setting the sticky bit on files was once used to force a copy of the file to stay in swap space, in an attempt to speed execution the next time the file was used. This hasn't been used in quite some time, due to advances in memory management. You can still set the sticky bit on a file, but the kernel will just ignore it.
Reference:
linuxquestions.org
Saturday, 16 October 2004
Achievement Award
Got an Achievement Award/Certificate from Sun Microsystems, in recognition for my effort with Siebel Benchmark!! =:)
Related post:
http://technopark02.blogspot.com/2004/10/sun-achieves-winning-siebel-benchmark.html
Related post:
http://technopark02.blogspot.com/2004/10/sun-achieves-winning-siebel-benchmark.html
Friday, 15 October 2004
Solaris/C/C++: Benefit(s) of Linker (symbol) Scoping
Introduction
By default, the static linker (ld) makes all ELF symbols global in scope. This means it puts the symbols into the dynamic symbol table of the resulting binary such that other binary modules can access those symbols. The dynamic relocations that the dynamic linker performs during run-time are only necessary for the global (also known as external or exported) symbols. The static linker resolves references to local symbols (for example, names of static functions) statically when it links the binary.
Application performs better if the run-time linker (ld.so.1) has less number of relocations (relocations are expensive). It can be achieved by reducing the scope of some of the symbols i.e., by not exporting all the symbols or simply by not making all symbols global in scope. Export only those symbols that are need by external modules with SS9's (Sun Studio 9) compiler flag -xldscope=hidden & __declspec(dllexport | dllimport) specifiers
Advantages
1) -Kpic Vs -KPIC
We can take advantage of -Kpic (PIC = Position Independent Code) which is the fastest compared to -KPIC. -Kpis can handle only 2048 global symbols, but fast. Since we were reducing the global symbol count, most of the libraries can be compiled with -Kpic
The PIC-compiled code allows the linker to keep a read-only version of the text (code) segment for a given shared library. The dynamic linker can share this text segment among all running processes, referencing it at a given time
2) Less chance for name collisions with 3rd party libraries
Name collisions are hard to detect/bug. 3rd party libraries can create havoc when some of their symbol names coincide with those in the application. For example, if a third-party shared library uses a global symbol with the same name as a global symbol in one of the application's shared libraries, the symbol from the third-party library may interpose on yours and unintentionally change the functionality of your application without any warning
3) Improved performance
It lets the optimiser produce better code. PLT indirections (when a function call or variable access must be looked up via the Global Offset Table) can be completely avoided, thus substantially avoiding pipeline stalls on modern processors and thus much faster code. Furthermore when most of the symbols are bound locally, they can be safely elided (removed) completely through the entire shared object. This gives greater latitude especially to the inliner which no longer needs to keep an entry point around "just in case"
In summary: Application performs better due to the decreased size of the link maps and reduced number of page faults resulting from symbol scope reduction
4) Improved load times of shared libraries during run-time
5) Improved security
strip utility is not enough to hide the names of the application's routines and data items; stripping eliminates the local symbols but not the global symbols
Dynamically linked binaries (both executables and shared libraries) use two symbol tables: the static symbol table and the dynamic symbol table. The dynamic symbol table is used by the runtime linker. It has to be present even in stripped executables, or else the dynamic linker is not able to find the symbols it needs. The strip utility can only remove the static symbol table
By making most of the symbols of the application local in scope, the symbol information for such local symbols in a stripped binary is really gone and are not available at runtime; so no one can extract it
6) Reduced application binary sizes
More detailed explanation & examples are available at:
http://technopark02.blogspot.com/2004_09_01_technopark02_archive.html
References:
1) SS9 C++ user's guide
2) Article: "Enhancing Applications by Directing Linker Symbol Processing" by "Greg Nakhimovsky", Sun Microsystems, Inc.
3) Niall Douglas' "GCC Symbol Visibility Patch" release notes:
http://www.nedprod.com/programs/gccvisibility.html
Wednesday, 13 October 2004
Sun C/C++: #pragma pack
Let's have a look at the following program and the output
bpte4500s001:/sunbuild1/giri/testcases/%cat aligndata.c
bpte4500s001:/sunbuild1/giri/testcases/%./a.out
-NO- it is not a bug. Sun Studio compiler(s) generate 32-bit code, and in that mode there is a significant run-time performance penalty for unaligned accesses, like accessing a 32-bit int which isn't aligned on a 32-bit dword boundary. To produce faster code, Sun Studio compiler(s) pads struct members so that each one can be accessed without delays; this sometimes produces struct size which is larger than the sum of the sizes of its members
If this is not the desired behavior and if we don't want to get the structure padded, we can let compiler know the same by using a compiler directive (aka pragma) called "pack". Syntax of pragma pack:
If the value of n is the same as or greater than the strictest alignment on the platform, the directive has the effect of natural alignment
A pack directive applies to all structure definitions which follow it, until the next pack directive.
Lets include the pragma 'pack' in our source and run the program
bpte4500s001:/sunbuild1/giri/testcases/%cat aligndata.c
When using #pragma pack on a SPARC platform to pack denser than the type's default alignment, the -misalign option must be specified for both the compilation and the linking of the application
Reference:
Sun Studio 9 C++ user's guide
Acknowledgements:
Dheeraj (aka tw|lit), Naresh Shroff
bpte4500s001:/sunbuild1/giri/testcases/%cat aligndata.c
#include <stdio.h>
typedef struct user {
char name[10];
int age;
float salary;
} usr;
int main()
{
printf("\n ** sizeof(char) = %d, sizeof(int) = %d, sizeof(float) = %d\n ** sizeof(struct user) = %d\n", sizeof(char), sizeof(int), sizeof(float), sizeof(struct user));
return (0);
}
bpte4500s001:/sunbuild1/giri/testcases/%./a.out
** sizeof(char) = 1, sizeof(int) = 4, sizeof(float) = 4sizeof(struct user) is supposed to return 18, but returned 20. What's wrong with the compiler - is it a bug?
** sizeof(struct user) = 20
-NO- it is not a bug. Sun Studio compiler(s) generate 32-bit code, and in that mode there is a significant run-time performance penalty for unaligned accesses, like accessing a 32-bit int which isn't aligned on a 32-bit dword boundary. To produce faster code, Sun Studio compiler(s) pads struct members so that each one can be accessed without delays; this sometimes produces struct size which is larger than the sum of the sizes of its members
If this is not the desired behavior and if we don't want to get the structure padded, we can let compiler know the same by using a compiler directive (aka pragma) called "pack". Syntax of pragma pack:
#pragma pack(n)n must be 0 or a power of 2. A value of other than 0 instructs the compiler to use the smaller of n-byte alignment and the platform's natural alignment for the data type. A value of 1 instructs the compiler not to perform any alignment. When n is 0 or omitted, the member alignment reverts to the natural alignment values.
If the value of n is the same as or greater than the strictest alignment on the platform, the directive has the effect of natural alignment
A pack directive applies to all structure definitions which follow it, until the next pack directive.
Lets include the pragma 'pack' in our source and run the program
bpte4500s001:/sunbuild1/giri/testcases/%cat aligndata.c
#include <stdio.h>bpte4500s001:/sunbuild1/giri/testcases/%./a.out
#pragma pack(1)
typedef struct user {
char name[10];
int age;
float salary;
} usr;
int main()
{
printf("\n ** sizeof(char) = %d, sizeof(int) = %d, sizeof(float) = %d\n ** sizeof(struct user) = %d\n", sizeof(char), sizeof(int), sizeof(float), sizeof(struct user));
return (0);
}
** sizeof(char) = 1, sizeof(int) = 4, sizeof(float) = 4Note:
** sizeof(struct user) = 18
When using #pragma pack on a SPARC platform to pack denser than the type's default alignment, the -misalign option must be specified for both the compilation and the linking of the application
Reference:
Sun Studio 9 C++ user's guide
Acknowledgements:
Dheeraj (aka tw|lit), Naresh Shroff
Monday, 11 October 2004
C/C++: Structure Vs Union
A structure is a collection of items of different types; and each data item will have its own memory location. Where as only one item within the union can be used at any time, because the memory allocated for each item inside the union is in a shared memory location i.e., only one memory location will be shared by the data items of union.
Size of union will be the size of the biggest variable.
Why do we need Union in the first place?
Sometimes we may not need the data of all the (related) data items of a complex data structure and be storing/accessing only one data item at a time. Union helps in such scenarios.
e.g.,
Wind Chill is only calculated when it is cold and heat index is used only when it is hot. There is no need for both of them at the same time. So when we specify the temp, feels_like will have only one value - either wind chill or heat index, but not both.
The following simple program illustrate the above explanation:
Size of union will be the size of the biggest variable.
Why do we need Union in the first place?
Sometimes we may not need the data of all the (related) data items of a complex data structure and be storing/accessing only one data item at a time. Union helps in such scenarios.
e.g.,
typedef union
{
        int Wind_Chill;
        char Heat_Index;
} Condition;

typedef struct
{
        float temp;
        Condition feels_like;
} Temperature;
Wind Chill is only calculated when it is cold and heat index is used only when it is hot. There is no need for both of them at the same time. So when we specify the temp, feels_like will have only one value - either wind chill or heat index, but not both.
The following simple program illustrate the above explanation:
% cat structunion.c
#include <stdio.h>
#include <stdlib.h>

typedef union
{
        int Wind_Chill;
        char Heat_Index;
} Condition;

typedef struct
{
        float temp;
        Condition feels_like;
} Temperature;

void main()
{
        Temperature *tmp;

        tmp = (Temperature *)malloc(sizeof(Temperature));

        printf("\nAddress of Temperature = %u", tmp);
        printf("\nAddress of temp = %u, feels_like = %u", &(*tmp).temp,  &(*tmp).feels_like);
        printf("\nWind_Chill = %u, Heat_Index= %u\n", &((*tmp).feels_like).Wind_Chill, &((*tmp).feels_like).Heat_Index);
}

% cc -o structunion structunion.c

% ./structunion
Address of Temperature = 165496
Address of temp = 165496, feels_like = 165500
Wind_Chill = 165500, Heat_Index= 165500
C/C++/Java: ++ unary operator
#include <stdio.h>What will be the total after the execution of total = ++i + j++ statement? 12?
int main()
{
int i = 5, j = 5;
int total = 0;
total = ++i + j++;
printf("\ntotal of i & j = %d\n", total);
return(0);
}
Let's check the output of this program:
total of i & j = 11Explanation:
The ++ (increment) operator adds 1 to the value of a scalar operand. ++ can either be placed before or after the operand. If it appears before the operand, the operand is incremented, and then the incremented value is used in the expression. If it appears after the operand, the value of the operand is used in the expression before the operand is incremented
so in our example, total = ++i + j++ is equivalent to the following three expressions:
i = i + 1;Then simple substitution & math show the final value of total as "11"
total = i + j;
j = j + 1;
PS:
If the operand is a pointer, ++ increments the operand by the size of the object to which it points
Thursday, 7 October 2004
Sun achieves winning Siebel benchmark
I'm very glad to be one of the major contributors of this benchmarking effort. As Sun hasn't published any competitive benchmarking numbers running Siebel on Sun platform for long, we started off with a single goal "must win" and put Sun on the top of UNIX vendors list with very well balanced price/performance ratio. P/P is what really the customer cares about i.e., customer needs superior performance with low cost.
We spent nearly two and half months (project duration: 3 months) on fixing various issues ranging from simple configuration issues to memory leaks in Siebel components & core dumps to scalability issues. Finally on 6th of september (labor day) the big day has arrived; able to simulate 10000 concurrent virtual users hitting the same oracle database (running on a "dual core" UltraSPARC IV machine, E2900) at the same time with an average think time of 30 sec and with an average response time of about 0.5 sec. UltraSPARC IV rocked by handling 662 concurrent users at app tier & 4902 users at database tier. Hewlett-Packard's (holding the top spot by then) numbers are 385 & 1786 at app & db tiers respectively. HPs numbers are not even comparable to Sun's numbers and lagging by 72% & 174% at both app & db tiers. Needless to say Sun Microsystems moved comfortably to the top spot by winning this benchmark. 'Way To Go' Sun!!
Obviously my manager 'George Drapeau' was very excited with the success of the project and discussed the effort in his blog at: http://blogs.sun.com/roller/page/drapeau/20041003#sun_and_siebel_kick_some &
http://blogs.sun.com/roller/page/drapeau/20041005#when_good_benchmarks_go_bad
Sun Microsystems released a press note with the result of the benchmark on 10th October:
http://www.sun.com/smi/Press/sunflash/2004-10/sunflash.20041005.1.html
Siebel systems published the certified results in their web site:
http://www.siebel.com/crm/performance-benchmark.shtm
Topology with all tiers:
http://blogs.sun.com/roller/resources/drapeau/pspptopology.jpg
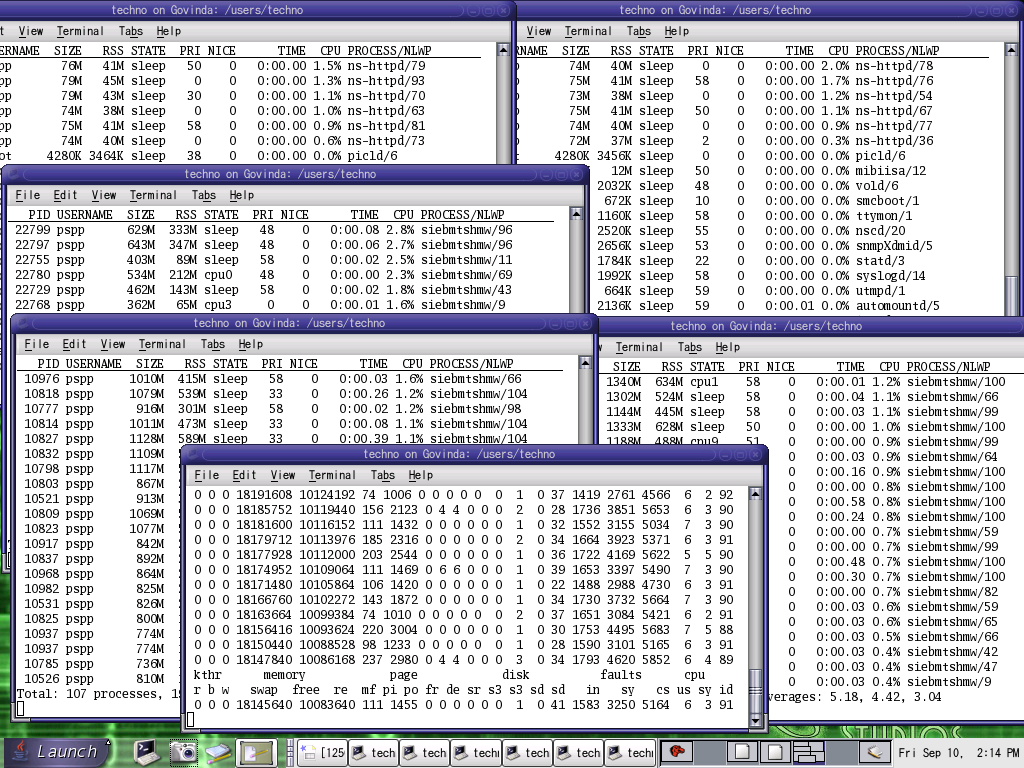
Screenshots of load generator & the resource monitoring:


We spent nearly two and half months (project duration: 3 months) on fixing various issues ranging from simple configuration issues to memory leaks in Siebel components & core dumps to scalability issues. Finally on 6th of september (labor day) the big day has arrived; able to simulate 10000 concurrent virtual users hitting the same oracle database (running on a "dual core" UltraSPARC IV machine, E2900) at the same time with an average think time of 30 sec and with an average response time of about 0.5 sec. UltraSPARC IV rocked by handling 662 concurrent users at app tier & 4902 users at database tier. Hewlett-Packard's (holding the top spot by then) numbers are 385 & 1786 at app & db tiers respectively. HPs numbers are not even comparable to Sun's numbers and lagging by 72% & 174% at both app & db tiers. Needless to say Sun Microsystems moved comfortably to the top spot by winning this benchmark. 'Way To Go' Sun!!
Obviously my manager 'George Drapeau' was very excited with the success of the project and discussed the effort in his blog at: http://blogs.sun.com/roller/page/drapeau/20041003#sun_and_siebel_kick_some &
http://blogs.sun.com/roller/page/drapeau/20041005#when_good_benchmarks_go_bad
Sun Microsystems released a press note with the result of the benchmark on 10th October:
http://www.sun.com/smi/Press/sunflash/2004-10/sunflash.20041005.1.html
Siebel systems published the certified results in their web site:
http://www.siebel.com/crm/performance-benchmark.shtm
Topology with all tiers:
http://blogs.sun.com/roller/resources/drapeau/pspptopology.jpg
Screenshots of load generator & the resource monitoring:

Wednesday, 6 October 2004
Database: Oracle Server Architecture (overview)
Oracle server consists of the following core components:

    1) database(s) &

    2) instance(s)


1) database consists of:

    1) datafiles (.dbf files) <- information (data) will be stored in flat files on the disk

    2) redo logs (.rdo & .arc files)

            Redo Logs hold recordings of every change made to datafiles; useful for fine-grained

            recovery of specific changes. Oracle uses several of these files so that when it gets done

            writing to the last file in the series, it begins overwriting to the first online redo log file. A

            set of redo log files is called the redo log

    3) control files (.ctl files)

            contain parameters (to configure how the database starts), and password files (to

            manage authentication)


2)  Instances provide the capability of accessing stored data. Each instance consists of:


    1) Program Global Area (PGA)

            When single-threaded servers are used, the Program Global Area (PGA) contains data

            (such as user’s session variables and arrays) for use only by a single process. Its

            contents is not visible to other processes

            eg., parse information from queries, database cursors


    2) System Global Area (SGA)

            The Shared System Global Area (SGA) contains user data and control information for a

            single oracle instance. Its contents are visible/accessible to several user applications

            and system processes


    3)  system processes and user applications

    4) db buffer cache, shared pool, redo log buffer etc.,


Datafiles:

    user data, system data, index, configuration & logs


Database structure

    logical & physical structures


logical:

    tables, tablespaces, segments, extents & oracle blocks


physical:

    raw files on disk


shared pool:

    contains data dictionary and SQL statements submitted for processing by users. None of the user data will be stored here
Tuesday, 5 October 2004
Linux: Frozen Xwindows
If Xwindows seem frozen, the following simple key strokes may bring back the Xserver without the need for a reboot
Two ways to kill the Xwindows session (Xserver)
(1) press "ctrl + alt + backspace"
If xdm been running, a new X server will be spawned immediately and prompts with the login screen
(2) press "ctrl + alt + F2"
It brings up a a virtual console; login and run:
# ps -ax | grep startx
It will give you the PID of the Xserver. Just kill it with:
# kill -9 <PID>
To go back to the first console, just press "alt+F1"
Tuesday, 28 September 2004
Solaris: Virtual Memory System
VM system manages the mapping of physical to users processes & kernel i.e., VM system manages system's memory on behalf of kernel and processes
Responsibilities of VM system:
(1) manages virtual-to-physical mapping of memory
(2) presents a simple memory programming model to applications so that application developers need not know how the underlying memory hardware is arranged <- memory is abstracted; user applications deal with virtual addresses and virtual address spaces
(3) allows processes to see linear ranges of bytes in their address space regardless of the physical layout or fragmentation of real memory
(4) efficient allocation of physical memory to processes & kernel subsystems
VM system uses slower storage medium (disk) to store data that doesn't fit within the physical memory (RAM) of the system, thus accomodating programs larger than the size of physical memory
(5) keeps most frequently used portions of memory in the RAM, to make the application run faster; manages swapping of memory between primary and secondary storage to optimize performance
(6) handles requirements of shared images between multiple users & processes
Quick Notes:
Address space:
linear range of memory
Every process will have an address space; each address space isbroken into several segments that represent mapping of the executable, heap, shared libraries & a program stack
Each segment is divided into equal sized pieces of VM known as pages. Hardware MMU (Memory Management Unit) does the mapping of VM pages to physical memory
Demand Paging:
VM system implements demand paging; pages of memory are allocated on demand
Page Fault:
MMU raises an event to tell the kernel that an access has occured to an area of memory that doesn't have the physical memory mapped to it. Heap of a process is also allocated in a similar way.
Initially only VM space (address space) is allocated to the process. When the memory is first referenced, a page fault occurs and the memory is allocated one page at a time
Most of the kernel's memory is not pageable; i.e., it is allocated from physical memory which cannot be stolen by page scanner
Each page of physical memory is associated with a file and an offset; the file and offset identify the backing store for the page
Anonymous memory:
pages used for regular process heap and stack; swapfs takes care of that. Anon memory doesn't have a vnode attached to it
Dirty page:
A page that has had its contents modified
Heap:
scratch memory aka temporary processing space for a process
Hardware Memory Management Unit (MMU) maps pages into physical memory by using a platform specific set of translation tables called Translation Lookaside Buffer (TLB) & Translation Software Buffer (TSB)
Sunday, 26 September 2004
Linux: Installing Source RPM (SRPM) package
RPM stands for RedHat Package Manager. RPM is a system for installing and managing software & most common software package manager used for Linux distributions. Because it allows you to distribute software already compiled, a user can install the software with a single command.
There are two flavors of RPMs: binary & source code. Source code are designated by ending with -src.rpm rather than just .rpm
Installing source rpms (SRPM):
Unlike ordinary packages, they can't be uninstalled using RPM. SRPM packages are not under the control of the RPM database. All RPM does is copy the files contained in the package to the hard disk. SRPMs are not listed in the RPM database and not marked as installed in YaST's package selection forms.
A source RPM (SRPM) package typically contains a gzipped tar archive with the source files, and an RPM spec file
Govinda:/users/techno/downloads # ls -l xmms*src*
-rw------- 1 techno users 4032244 2004-09-28 12:43 xmms-1.2.10-1.src.rpm
Listing the contents of a source rpm:
Govinda:/users/techno/downloads # rpm -qpl xmms-1.2.10-1.src.rpm
xmms-1.2.10.tar.gz
xmms.spec
Source rpm can be installed just like any other rpm with "-ivvh" flags
Govinda:/users/techno/downloads # rpm -ivvh xmms-1.2.10-1.src.rpm
D: counting packages to install
D: found 1 packages
D: looking for packages to download
D: retrieved 0 packages
D: New Header signature
D: Signature size: 180
D: Signature pad : 4
D: sigsize : 184
D: Header + Archive: 4031964
D: expected size : 4031964
D: found 1 source and 0 binary packages
D: New Header signature
D: Signature size: 180
D: Signature pad : 4
D: sigsize : 184
D: Header + Archive: 4031964
D: expected size : 4031964
D: installing a source package
D: sources in: /usr/src/packages/SOURCES
D: spec file in: /usr/src/packages/SPECS
D: file: xmms-1.2.10.tar.gz action: unknown
D: file: xmms.spec action: unknown
xmms ##################################################
GZDIO: 494 reads, 4041876 total bytes in 0.020 secs
Verbose output shows that the sources are under: /usr/src/packages/SOURCES & the specification (SPEC) file is under: /usr/src/packages/SPECS
Govinda:/users/techno/downloads # ls -l /usr/src/packages/SOURCES/xmms*
-rw-rw-r-- 1 root root 4034832 2004-02-23 13:54 /usr/src/packages/SOURCES/xmms-1.2.10.tar.gz
Govinda:/users/techno/downloads # ls -l /usr/src/packages/SPECS/xmms*
-rw-rw-r-- 1 root root 6665 2004-02-23 13:57 /usr/src/packages/SPECS/xmms.spec
The RPM build tree
-----------------------
To use RPM as a tool for building software packages, we must follow some rules in terms of locations for the source code used to build this software. Expect two different kinds of input to build a package:
(1) Source
Of course we need source code to build the package (assume that we got the source without any customizations). Usually these sources are distributed as compresse tar file (tgz). RPM can handle other formats as well
(2) Spec file
The spec file is the heart of RPM's package building process. It's like a make file, as it contains information on how to build the package. But it's settled on a much higher level and contains all meta information about the package. .spec is the extension for SPEC files
Note:
It is not uncommon to have a patch included in the source files
RPM directories for building packages
----------------------------------------------------------------------------------
Directory Contents
----------------------------------------------------------------------------------
SPECS Spec files
SOURCES Source and patch files
BUILD Used to build (unpack and compile) the software package
RPMS Contains the build RPM files (sorted by architecture)
SRPMS Contains the build SRPM files
RPM Build Stages
---------------------------------------------------------------------
Flag Stage
---------------------------------------------------------------------
p prep (unpack sources and apply patches)
l list check (do some cursory checks on %files)
c compile (prep and compile)
i install (prep, compile, install)
b binary package (prep, compile, install, package)
a bin/src package (prep, compile, install, package)
Building the Package
-------------------------
After the SRPM is installed, we can continue with the RPM build stages. RPM builds packages in 4 stages:
(1) Preparation
The prep-stage is where the actual work building the binary package starts. In this stage the sources are unpacked and the patches to the sources are applied (if any). If the package builder had forseen any additional preparations which have to be done prior to compiling the sources, they will be executed in this stage
(2) Compilation
After the sources are prepared, the compilation process can take place. In this stage all source files are compiled and linked to the resulting binaries, libraries, etc.
(3) Installation
This stage installs the new software package on the system. At this point the build process changes your actual system. It puts the binaries, libraries, configuration files, etc. in the places where they belong for the new software package. No entry is made in the RPM database reflecting this installation.
Quick Note:
Installing binaries from a source package doesn't include that the package is under the control of the RPM database
(4) Packaging
The last step is to create the RPM and the SRPM for the new software package. You can turn off this stage when you just want to compile and install the package. Better create the new SRPM, if sources were modified ange the behavior of the binaries
RPM Build Options
------------------------------------------------------------------------------------
Option Meaning
------------------------------------------------------------------------------------
-bstage-spec or
-tstage-tarball build package (see table 34-2 for stage spec)
--short-circuit skip straight to specified stage (only for c,i)
--clean remove build tree when done
--rmsource remove sources and spec file when done
--buildrootdir use dir as the build root
--buildarcharch build the packages for architecture arch
--buildosos build the packages for operating system os
--test do not execute any stages
--timechecksecs set the time check to secs seconds (0 disables)
--rebuildsrpm install source package, build binary package and remove
spec file, sources, patches, and icons.
--rmsourcespec remove sources and spec file
--recompilesrpm like --rebuild, but don't build any package
------------------------------------------------------------------------------------
To start the build process use the command rpm -b with the spec file as argument. Running rpm -ba will go through all stages and result in a RPM package, a SRPM package, and the software installed in your system (but not entered in the RPM database). If you don't want to go through the whole build process and want to stop at a certain stage, you can give the stage name as additional argument to rpm
If you are only interested in looking at the source code, you can stop at prep stage. The sources are installed, unpacked, and all changes SuSE made to them are applied
Govinda:/usr/src/packages/SPECS # rpm -bp xmms.spec
Executing(%prep): /bin/sh -e /var/tmp/rpm-tmp.69504
+ umask 022
+ cd /usr/src/packages/BUILD
+ cd /usr/src/packages/BUILD
+ rm -rf xmms-1.2.10
+ /bin/gzip -dc /usr/src/packages/SOURCES/xmms-1.2.10.tar.gz
+ tar -xf -
+ STATUS=0
+ '[' 0 -ne 0 ']'
+ cd xmms-1.2.10
++ /usr/bin/id -u
+ '[' 0 = 0 ']'
+ /bin/chown -Rhf root .
++ /usr/bin/id -u
+ '[' 0 = 0 ']'
+ /bin/chgrp -Rhf root .
+ /bin/chmod -Rf a+rX,g-w,o-w .
+ exit 0
First the tar files gets uncompressed and unpacked. If you look into the directory /usr/src/packages/BUILD after you execute the prep stage, you'll see that there is a subdirectory, xmms-1.2.10 containing the source files for the xmms package
Govinda:/usr/src/packages/BUILD/xmms-1.2.10 # ls -l
total 1841
drwxr-xr-x 12 root root 1232 2004-02-23 13:53 .
drwxrwxrwt 3 root root 80 2004-09-28 13:22 ..
-rw-r--r-- 1 root root 9127 2004-01-11 10:22 ABOUT-NLS
-rw-r--r-- 1 root root 2110 2004-01-16 16:41 AUTHORS
-rw-r--r-- 1 root root 17992 2003-05-19 14:22 COPYING
-rw-r--r-- 1 root root 212169 2004-02-23 13:53 ChangeLog
drwxr-xr-x 5 root root 200 2004-02-23 13:53 Effect
-rw-r--r-- 1 root root 6679 2000-12-22 15:09 FAQ
drwxr-xr-x 5 root root 192 2004-02-23 13:53 General
-rw-r--r-- 1 root root 9236 2003-05-19 14:22 INSTALL
drwxr-xr-x 8 root root 256 2004-02-23 13:53 Input
-rw-r--r-- 1 root root 238 2004-01-16 16:11 Makefile.am
-rw-r--r-- 1 root root 24209 2004-02-23 13:44 Makefile.in
-rw-r--r-- 1 root root 8395 2004-02-23 13:49 NEWS
drwxr-xr-x 8 root root 264 2004-02-23 13:53 Output
-rw-r--r-- 1 root root 40371 2004-01-16 16:41 README
....
....
To continue with the example, we'll go on to the compilation stage. You could either start over and let RPM do the preparation again, or use the prepared sources and jump right into the compilation. The default for RPM is to start over at the beginning. The command rpm -bc will have the source and patch files (if any) do the preparation work and then compile the source code. Since we have gone through the preparation already, we will short-circuit RPM and only do the compilation:
Govinda:/usr/src/packages/SPECS # rpm -bc --short-circuit xmms.spec
Executing(%build): /bin/sh -e /var/tmp/rpm-tmp.13688
+ umask 022
+ cd /usr/src/packages/BUILD
+ cd xmms-1.2.10
+ unset LINGUAS
+ CFLAGS=-O2 -march=i486 -mcpu=i686
+ export CFLAGS
+ CXXFLAGS=-O2 -march=i486 -mcpu=i686
+ export CXXFLAGS
+ FFLAGS=-O2 -march=i486 -mcpu=i686
+ export FFLAGS
+ '[' -f configure.in ']'
+ libtoolize --copy --force
You should update your `aclocal.m4' by running aclocal.
+ ./configure i386-pc-linux --prefix=/usr --exec-prefix=/usr --bindir=/usr/bin --sbindir=/usr/sbin --sysconfdir=/etc --datadir=/usr/share --includedir=/usr/include --libdir=/usr/lib --libexecdir=/usr/libexec --localstatedir=/var --sharedstatedir=/usr/com --mandir=/usr/share/man --infodir=/usr/share/info
configure: WARNING: you should use --build, --host, --target
checking build system type... i386-pc-linux
checking host system type... i386-pc-linux
...
...
make[3]: Entering directory `/usr/src/packages/BUILD/xmms-1.2.10/libxmms'
if /bin/sh ./libtool --mode=compile gcc -DHAVE_CONFIG_H -I. -I. -I. -I/usr/include/gtk-1.2 -I/usr/include/glib-1.2 -I/usr/lib/glib/include -D_REENTRANT -I/usr/X11R6/include -I../intl -I.. -O2 -march=i486 -mcpu=i686 -Wall -Wpointer-arith -MT configfile.lo -MD -MP -MF ".deps/configfile.Tpo" -c -o configfile.lo `test -f 'configfile.c' || echo './'`configfile.c; then mv -f ".deps/configfile.Tpo" ".deps/configfile.Plo"; else rm -f ".deps/configfile.Tpo"; exit 1; fi
gcc -DHAVE_CONFIG_H -I. -I. -I. -I/usr/include/gtk-1.2 -I/usr/include/glib-1.2 -I/usr/lib/glib/include -D_REENTRANT -I/usr/X11R6/include -I../intl -I.. -O2 -march=i486 -mcpu=i686 -Wall -Wpointer-arith -MT configfile.lo -MD -MP -MF .deps/configfile.Tpo -c configfile.c -o configfile.o
...
...
After this step the binaries are ready to be installed in your system. You can copy them manually if you are only interested in special parts of the package, or let RPM install the entire set. This is done with rpm -bi. Again, this command by default starts at the very beginning. But we can use the --short-circuit switch again to skip the first two stages:
# rpm -bi --short-circuit xmms.spec
Executing: %install
+ umask 022
+ cd /usr/src/packages/BUILD
+ cd rxvt-2.4.7
+ make install
./autoconf/mkinstalldirs /usr/X11R6/bin
./autoconf/mkinstalldirs /usr/X11R6/man/man1
make[1]: Entering directory `/usr/src/packages/BUILD/xmms-1.2.10/src'
....
....
Besides the missing entry in the RPM database, you now have the same status as you would have with the installed binary package.
The last stage is to create the binary and the source packages. You do this with rpm -ba. Unfortunately there is no way to skip the other stages for this option. So you have to go through the whole process again. The only choice you have is to skip building of the source package. If you want to do this use rpm -bb instead of rpm -ba. In order to have a complete example we will create the binary and the source package:
# rpm -bb xmms.spec
Executing(%prep): /bin/sh -e /var/tmp/rpm-tmp.3103
+ umask 022
+ cd /usr/src/packages/BUILD
+ cd /usr/src/packages/BUILD
+ rm -rf xmms-1.2.10
+ /bin/gzip -dc /usr/src/packages/SOURCES/xmms-1.2.10.tar.gz
...
...
Wrote: /usr/src/packages/SRPMS/xmms-1.2.10.src.rpm
Wrote: /usr/src/packages/RPMS/i386/xmms-1.2.10.i386.rpm
The build process is completed. RPM tells you where it put the source and the binary package
For the impatient
=============
Method# 1:
step (1) Install source rpm
step (2) cd into /usr/src/SPECS directory and run the following commands in order to build the source according the spec files:
step (3) Install the RPM that you just built:
To compile and install a source RPM package, do the following:
# rpm --rebuild <application>.src.rpm
…
(lots of output)
…
Wrote: /usr/src/packages/RPMS/i386/<application>.i386.rpm
…
+ exit 0
…
If all goes well, you can skip everything below. If not, you may want to cd /usr/src/packages/BUILD/<application>-Version, read on below, and try to figure out how to compile the application
There are two flavors of RPMs: binary & source code. Source code are designated by ending with -src.rpm rather than just .rpm
Installing source rpms (SRPM):
Unlike ordinary packages, they can't be uninstalled using RPM. SRPM packages are not under the control of the RPM database. All RPM does is copy the files contained in the package to the hard disk. SRPMs are not listed in the RPM database and not marked as installed in YaST's package selection forms.
A source RPM (SRPM) package typically contains a gzipped tar archive with the source files, and an RPM spec file
Govinda:/users/techno/downloads # ls -l xmms*src*
-rw------- 1 techno users 4032244 2004-09-28 12:43 xmms-1.2.10-1.src.rpm
Listing the contents of a source rpm:
Govinda:/users/techno/downloads # rpm -qpl xmms-1.2.10-1.src.rpm
xmms-1.2.10.tar.gz
xmms.spec
Source rpm can be installed just like any other rpm with "-ivvh" flags
Govinda:/users/techno/downloads # rpm -ivvh xmms-1.2.10-1.src.rpm
D: counting packages to install
D: found 1 packages
D: looking for packages to download
D: retrieved 0 packages
D: New Header signature
D: Signature size: 180
D: Signature pad : 4
D: sigsize : 184
D: Header + Archive: 4031964
D: expected size : 4031964
D: found 1 source and 0 binary packages
D: New Header signature
D: Signature size: 180
D: Signature pad : 4
D: sigsize : 184
D: Header + Archive: 4031964
D: expected size : 4031964
D: installing a source package
D: sources in: /usr/src/packages/SOURCES
D: spec file in: /usr/src/packages/SPECS
D: file: xmms-1.2.10.tar.gz action: unknown
D: file: xmms.spec action: unknown
xmms ##################################################
GZDIO: 494 reads, 4041876 total bytes in 0.020 secs
Verbose output shows that the sources are under: /usr/src/packages/SOURCES & the specification (SPEC) file is under: /usr/src/packages/SPECS
Govinda:/users/techno/downloads # ls -l /usr/src/packages/SOURCES/xmms*
-rw-rw-r-- 1 root root 4034832 2004-02-23 13:54 /usr/src/packages/SOURCES/xmms-1.2.10.tar.gz
Govinda:/users/techno/downloads # ls -l /usr/src/packages/SPECS/xmms*
-rw-rw-r-- 1 root root 6665 2004-02-23 13:57 /usr/src/packages/SPECS/xmms.spec
The RPM build tree
-----------------------
To use RPM as a tool for building software packages, we must follow some rules in terms of locations for the source code used to build this software. Expect two different kinds of input to build a package:
(1) Source
Of course we need source code to build the package (assume that we got the source without any customizations). Usually these sources are distributed as compresse tar file (tgz). RPM can handle other formats as well
(2) Spec file
The spec file is the heart of RPM's package building process. It's like a make file, as it contains information on how to build the package. But it's settled on a much higher level and contains all meta information about the package. .spec is the extension for SPEC files
Note:
It is not uncommon to have a patch included in the source files
RPM directories for building packages
----------------------------------------------------------------------------------
Directory Contents
----------------------------------------------------------------------------------
SPECS Spec files
SOURCES Source and patch files
BUILD Used to build (unpack and compile) the software package
RPMS Contains the build RPM files (sorted by architecture)
SRPMS Contains the build SRPM files
RPM Build Stages
---------------------------------------------------------------------
Flag Stage
---------------------------------------------------------------------
p prep (unpack sources and apply patches)
l list check (do some cursory checks on %files)
c compile (prep and compile)
i install (prep, compile, install)
b binary package (prep, compile, install, package)
a bin/src package (prep, compile, install, package)
Building the Package
-------------------------
After the SRPM is installed, we can continue with the RPM build stages. RPM builds packages in 4 stages:
(1) Preparation
The prep-stage is where the actual work building the binary package starts. In this stage the sources are unpacked and the patches to the sources are applied (if any). If the package builder had forseen any additional preparations which have to be done prior to compiling the sources, they will be executed in this stage
(2) Compilation
After the sources are prepared, the compilation process can take place. In this stage all source files are compiled and linked to the resulting binaries, libraries, etc.
(3) Installation
This stage installs the new software package on the system. At this point the build process changes your actual system. It puts the binaries, libraries, configuration files, etc. in the places where they belong for the new software package. No entry is made in the RPM database reflecting this installation.
Quick Note:
Installing binaries from a source package doesn't include that the package is under the control of the RPM database
(4) Packaging
The last step is to create the RPM and the SRPM for the new software package. You can turn off this stage when you just want to compile and install the package. Better create the new SRPM, if sources were modified ange the behavior of the binaries
RPM Build Options
------------------------------------------------------------------------------------
Option Meaning
------------------------------------------------------------------------------------
-bstage-spec or
-tstage-tarball build package (see table 34-2 for stage spec)
--short-circuit skip straight to specified stage (only for c,i)
--clean remove build tree when done
--rmsource remove sources and spec file when done
--buildrootdir use dir as the build root
--buildarcharch build the packages for architecture arch
--buildosos build the packages for operating system os
--test do not execute any stages
--timechecksecs set the time check to secs seconds (0 disables)
--rebuildsrpm install source package, build binary package and remove
spec file, sources, patches, and icons.
--rmsourcespec remove sources and spec file
--recompilesrpm like --rebuild, but don't build any package
------------------------------------------------------------------------------------
To start the build process use the command rpm -b with the spec file as argument. Running rpm -ba will go through all stages and result in a RPM package, a SRPM package, and the software installed in your system (but not entered in the RPM database). If you don't want to go through the whole build process and want to stop at a certain stage, you can give the stage name as additional argument to rpm
If you are only interested in looking at the source code, you can stop at prep stage. The sources are installed, unpacked, and all changes SuSE made to them are applied
Govinda:/usr/src/packages/SPECS # rpm -bp xmms.spec
Executing(%prep): /bin/sh -e /var/tmp/rpm-tmp.69504
+ umask 022
+ cd /usr/src/packages/BUILD
+ cd /usr/src/packages/BUILD
+ rm -rf xmms-1.2.10
+ /bin/gzip -dc /usr/src/packages/SOURCES/xmms-1.2.10.tar.gz
+ tar -xf -
+ STATUS=0
+ '[' 0 -ne 0 ']'
+ cd xmms-1.2.10
++ /usr/bin/id -u
+ '[' 0 = 0 ']'
+ /bin/chown -Rhf root .
++ /usr/bin/id -u
+ '[' 0 = 0 ']'
+ /bin/chgrp -Rhf root .
+ /bin/chmod -Rf a+rX,g-w,o-w .
+ exit 0
First the tar files gets uncompressed and unpacked. If you look into the directory /usr/src/packages/BUILD after you execute the prep stage, you'll see that there is a subdirectory, xmms-1.2.10 containing the source files for the xmms package
Govinda:/usr/src/packages/BUILD/xmms-1.2.10 # ls -l
total 1841
drwxr-xr-x 12 root root 1232 2004-02-23 13:53 .
drwxrwxrwt 3 root root 80 2004-09-28 13:22 ..
-rw-r--r-- 1 root root 9127 2004-01-11 10:22 ABOUT-NLS
-rw-r--r-- 1 root root 2110 2004-01-16 16:41 AUTHORS
-rw-r--r-- 1 root root 17992 2003-05-19 14:22 COPYING
-rw-r--r-- 1 root root 212169 2004-02-23 13:53 ChangeLog
drwxr-xr-x 5 root root 200 2004-02-23 13:53 Effect
-rw-r--r-- 1 root root 6679 2000-12-22 15:09 FAQ
drwxr-xr-x 5 root root 192 2004-02-23 13:53 General
-rw-r--r-- 1 root root 9236 2003-05-19 14:22 INSTALL
drwxr-xr-x 8 root root 256 2004-02-23 13:53 Input
-rw-r--r-- 1 root root 238 2004-01-16 16:11 Makefile.am
-rw-r--r-- 1 root root 24209 2004-02-23 13:44 Makefile.in
-rw-r--r-- 1 root root 8395 2004-02-23 13:49 NEWS
drwxr-xr-x 8 root root 264 2004-02-23 13:53 Output
-rw-r--r-- 1 root root 40371 2004-01-16 16:41 README
....
....
To continue with the example, we'll go on to the compilation stage. You could either start over and let RPM do the preparation again, or use the prepared sources and jump right into the compilation. The default for RPM is to start over at the beginning. The command rpm -bc will have the source and patch files (if any) do the preparation work and then compile the source code. Since we have gone through the preparation already, we will short-circuit RPM and only do the compilation:
Govinda:/usr/src/packages/SPECS # rpm -bc --short-circuit xmms.spec
Executing(%build): /bin/sh -e /var/tmp/rpm-tmp.13688
+ umask 022
+ cd /usr/src/packages/BUILD
+ cd xmms-1.2.10
+ unset LINGUAS
+ CFLAGS=-O2 -march=i486 -mcpu=i686
+ export CFLAGS
+ CXXFLAGS=-O2 -march=i486 -mcpu=i686
+ export CXXFLAGS
+ FFLAGS=-O2 -march=i486 -mcpu=i686
+ export FFLAGS
+ '[' -f configure.in ']'
+ libtoolize --copy --force
You should update your `aclocal.m4' by running aclocal.
+ ./configure i386-pc-linux --prefix=/usr --exec-prefix=/usr --bindir=/usr/bin --sbindir=/usr/sbin --sysconfdir=/etc --datadir=/usr/share --includedir=/usr/include --libdir=/usr/lib --libexecdir=/usr/libexec --localstatedir=/var --sharedstatedir=/usr/com --mandir=/usr/share/man --infodir=/usr/share/info
configure: WARNING: you should use --build, --host, --target
checking build system type... i386-pc-linux
checking host system type... i386-pc-linux
...
...
make[3]: Entering directory `/usr/src/packages/BUILD/xmms-1.2.10/libxmms'
if /bin/sh ./libtool --mode=compile gcc -DHAVE_CONFIG_H -I. -I. -I. -I/usr/include/gtk-1.2 -I/usr/include/glib-1.2 -I/usr/lib/glib/include -D_REENTRANT -I/usr/X11R6/include -I../intl -I.. -O2 -march=i486 -mcpu=i686 -Wall -Wpointer-arith -MT configfile.lo -MD -MP -MF ".deps/configfile.Tpo" -c -o configfile.lo `test -f 'configfile.c' || echo './'`configfile.c; then mv -f ".deps/configfile.Tpo" ".deps/configfile.Plo"; else rm -f ".deps/configfile.Tpo"; exit 1; fi
gcc -DHAVE_CONFIG_H -I. -I. -I. -I/usr/include/gtk-1.2 -I/usr/include/glib-1.2 -I/usr/lib/glib/include -D_REENTRANT -I/usr/X11R6/include -I../intl -I.. -O2 -march=i486 -mcpu=i686 -Wall -Wpointer-arith -MT configfile.lo -MD -MP -MF .deps/configfile.Tpo -c configfile.c -o configfile.o
...
...
After this step the binaries are ready to be installed in your system. You can copy them manually if you are only interested in special parts of the package, or let RPM install the entire set. This is done with rpm -bi. Again, this command by default starts at the very beginning. But we can use the --short-circuit switch again to skip the first two stages:
# rpm -bi --short-circuit xmms.spec
Executing: %install
+ umask 022
+ cd /usr/src/packages/BUILD
+ cd rxvt-2.4.7
+ make install
./autoconf/mkinstalldirs /usr/X11R6/bin
./autoconf/mkinstalldirs /usr/X11R6/man/man1
make[1]: Entering directory `/usr/src/packages/BUILD/xmms-1.2.10/src'
....
....
Besides the missing entry in the RPM database, you now have the same status as you would have with the installed binary package.
The last stage is to create the binary and the source packages. You do this with rpm -ba. Unfortunately there is no way to skip the other stages for this option. So you have to go through the whole process again. The only choice you have is to skip building of the source package. If you want to do this use rpm -bb instead of rpm -ba. In order to have a complete example we will create the binary and the source package:
# rpm -bb xmms.spec
Executing(%prep): /bin/sh -e /var/tmp/rpm-tmp.3103
+ umask 022
+ cd /usr/src/packages/BUILD
+ cd /usr/src/packages/BUILD
+ rm -rf xmms-1.2.10
+ /bin/gzip -dc /usr/src/packages/SOURCES/xmms-1.2.10.tar.gz
...
...
Wrote: /usr/src/packages/SRPMS/xmms-1.2.10.src.rpm
Wrote: /usr/src/packages/RPMS/i386/xmms-1.2.10.i386.rpm
The build process is completed. RPM tells you where it put the source and the binary package
For the impatient
=============
Method# 1:
step (1) Install source rpm
rpm -ivh <application>.src.rpmThis decompresses the source files into /usr/src directory under which the source and spec files (building parameters) are unloaded into the ./SOURCES and ./SPECS directories, respectively.
step (2) cd into /usr/src/SPECS directory and run the following commands in order to build the source according the spec files:
rpm -bb <application>.specThis compiles the source and packages the binaries into tidy RPM packages for you.
step (3) Install the RPM that you just built:
cd /usr/src/RPMSMethod# 2:
rpm -Uvh <application>.i386.rpm
To compile and install a source RPM package, do the following:
# rpm --rebuild <application>.src.rpm
…
(lots of output)
…
Wrote: /usr/src/packages/RPMS/i386/<application>.i386.rpm
…
+ exit 0
…
If all goes well, you can skip everything below. If not, you may want to cd /usr/src/packages/BUILD/<application>-Version, read on below, and try to figure out how to compile the application
Saturday, 25 September 2004
Linux: Installing Dynamic Fonts
Make sure xfs (X Font Server) is installed
1) Copy all true type/dynamic fonts to /usr/X11R6/lib/X11/fonts/truetype directory
2) Restart X Font Server as root user
/etc/init.d/xfs restart
3) Restart web browser
Alternate method:
1) Copy all true type/dynamic fonts to $HOME/.fonts
2) Restart X Font Server as root
/etc/init.d/xfs restart
3) Restart web browser
Let the browser show the fonts being used in the web page i.e., do not override the default font settings by selecting "Always use my fonts" option
Wednesday, 22 September 2004
UNIX/C: Program that prints Itself
Source:
% cat printme.c
Compilation line:
% CC -o printme printme.c
Output:
% ./printme
% cat printme.c
#include <stdio.h>
char *s="char *s=%c%s%c;%cmain(){printf(s,34,s,34,10,10);}%c";
main() {
printf(s,34,s,34,10,10);
}
Compilation line:
% CC -o printme printme.c
Output:
% ./printme
char *s="char *s=%c%s%c;%cmain(){printf(s,34,s,34,10,10);}%c";
main(){printf(s,34,s,34,10,10);}
Tuesday, 21 September 2004
SPARC: Position Independent Code (PIC)
The code within a dynamic executable is usually tied to a fixed address in memory; but position-independent code can be loaded anywhere in the address space of a process. Because the code is not tied to a specific address, it will execute correctly without page modification at a different address in each process that uses it. This code creates programs that require the smallest amount of page modification at runtime.
If a shared object is built from code that is not position-independent, the text segment will usually require a large number of relocations to be performed at runtime. Although the runtime linker is equipped to handle this, the system overhead this creates can cause serious performance degradation. The compiler can generate position-independent code with -Kpic option. Ideally, any frequently accessed data items benefit from using the -Kpic model
-Kpic Vs -KPIC
----------------
Both -Kpic & -KPIC affect references to global offset table entries. The global offset table is an array of pointers, the size of whose entries are constant for 32–bit (4 bytes) and 64–bit (8–bytes).
The code sequence to make reference to an entry under -Kpic is something like:
This code sequence provides a 13–bit displacement constant for the global offset table entry, and thus provides for 2048 unique entries (2^11) for 32–bit objects, and 1024 unique entries (2^10) for 64–bit objects. If an object is built that requires more than the available number of entries, the link-editor produces a fatal error:
Source:
Linker & Libraries Guide, Sun Microsystems Inc.,
If a shared object is built from code that is not position-independent, the text segment will usually require a large number of relocations to be performed at runtime. Although the runtime linker is equipped to handle this, the system overhead this creates can cause serious performance degradation. The compiler can generate position-independent code with -Kpic option. Ideally, any frequently accessed data items benefit from using the -Kpic model
-Kpic Vs -KPIC
----------------
Both -Kpic & -KPIC affect references to global offset table entries. The global offset table is an array of pointers, the size of whose entries are constant for 32–bit (4 bytes) and 64–bit (8–bytes).
The code sequence to make reference to an entry under -Kpic is something like:
ld [%l7 + j], %o0 ! load &j into %o0 Where %l7 is the precomputed value of the symbol _GLOBAL_OFFSET_TABLE_ of the object making the referenceThis code sequence provides a 13–bit displacement constant for the global offset table entry, and thus provides for 2048 unique entries (2^11) for 32–bit objects, and 1024 unique entries (2^10) for 64–bit objects. If an object is built that requires more than the available number of entries, the link-editor produces a fatal error:
$ CC -Kpic -G -o libhidden.so hidden.o extras.oTo overcome this error condition, some or all of the input relocatable objects have to be compiled with the -KPIC option
ld: fatal: too many symbols require `small' PIC references:

       have 2050, maximum 2048 -- recompile some modules -K PIC.
Source:
Linker & Libraries Guide, Sun Microsystems Inc.,