Creation Zone

  • Subscribe to our RSS feed.
  • Twitter
  • StumbleUpon
  • Reddit
  • Facebook
  • Digg

Sunday, 26 March 2006

SAXParseException: Element "web-app" does not allow "sometag" here

Posted on 01:36 by Unknown
Couple of days back, I was asked to look into some web server related issue, at our partner's site. According to them, they packaged and deployed the web application, per the instructions of Sun Java Web Server (aka iPlanet web server) documentation -- yet they couldn't access their application using a web browser. They gave me a clue that they noticed some error (see below) during the web server start up:

[23/Mar/2006:04:07:29] failure (11038): WEB4220: The web application [/mywebapp] is unavailable because of errors during startup. Please check the logs for errors

The first thing I did was to check the actual log (<webserver_root>/<server_instance>/logs/errors) file for a more detailed error message, and found the one that I'm looking for:
[23/Mar/2006:04:07:26] info (10896): WEB0100: Loading web module in virtual server [https-v490s001] at [/mywebapp]
[23/Mar/2006:04:07:26] info (10896): WEB0100: Loading web module in virtual server [https-v490s001] at [/search]
[23/Mar/2006:04:07:28] info (10896): CORE3282: stdout: PARSE error at line 27 column -1
[23/Mar/2006:04:07:28] info (10896): CORE3282: stdout: org.xml.sax.SAXParseException: Element "web-app" does not allow
"mime-mapping" here.

[23/Mar/2006:04:07:28] failure (10896): ContextConfig[/mywebapp] WEB3524: Parse error in application web.xml
It clearly says that the problem is with the mime-mapping tag in mywebapp's web.xml file. The last few lines of web.xml are like this:
        ...
...
<welcome-file-list>
<welcome-file>default.jsp
</welcome-file-list>
<mime-mapping>
<extension>xsd
<mime-type>text/xml
</mime-mapping>
</web-app>
The real problem is the actual order of welcome-file-list and mime-mapping tags in web.xml. mime-mapping tag should appear before welcome-file-list in web.xml file. So, swapping welcome-file-list and mime-mapping tags fixed the issue, and the web application is accessible through a web browser, now.

The key is finding the real order of all tags that we define in web.xml. All web.xml files should conform to the XML DTD for a Servlet web-app (war) module, in order for the web server to load the application, properly. The last known published DTD is available in Sun Microsystem's web site at: XML DTD for a Servlet 2.3 web-app (war) module. Apparently the following piece {in DTD} helped me resolving the issue:
<!--
The web-app element is the root of the deployment descriptor for
a web application.
-->
<!ELEMENT web-app (icon?, display-name?, description?, distributable?,
context-param*, filter*, filter-mapping*, listener*, servlet*,
servlet-mapping*, session-config?, mime-mapping*, welcome-file-list?,
error-page*, taglib*, resource-env-ref*, resource-ref*, security-constraint*,
login-config?, security-role*, env-entry*, ejb-ref*, ejb-local-ref*)>
Technorati Tags:
Sun | Web Server
Read More
Posted in | No comments

Wednesday, 22 March 2006

Updated C/C++ articles on Sun Developer Network (SDN)

Posted on 20:25 by Unknown
In an effort to clean up the outdated content, SDN/Sun Studio team got all the published articles reviewed one more time. Since there are two articles under my name, they forwarded the new feedback and asked me to make the changes, as they fit. The updated content is live now, and is available at the following URLs:
  1. Mixed-Language Programming and External Linkage
    Thanks to Lawrence Crowl (Sun) for the corrections; and also for suggesting a better solution for the example.


  2. Reducing Symbol Scope with Sun Studio C/C++
    Thanks to Mukesh Kapoor (Sun) for reading this lengthy article, and catching some unnoticed error in one of the programming examples.
Read More
Posted in | No comments

Saturday, 18 March 2006

Solaris: Better scalability with libumem

Posted on 15:16 by Unknown
Scalability issues with standard memory allocator

It is a known fact that multi-threaded applications do not scale well with standard memory allocator, because the heap is a bottleneck. When multiple threads simultaneously allocate or de-allocate memory from the allocator, the allocator will serialize them. Therefore, with the addition of more threads, we find more threads waiting, and the wait time grows longer, resulting in increasingly slower execution times. Due to this behavior, programs making intensive use of the allocator actually slow down as the number of processors increases. Hence standard malloc works well only in single-threaded applications, but poses serious scalability issues with multi-threaded applications running on multi-processor (SMP) servers.

Solution: libumem, an userland slab allocator

Sun started shipping libumem, an userland slab (memory) allocator, with Solaris 9 Update 3. libumem provides faster and more efficient memory allocation by using an object caching mechanism. Object caching is a strategy in which memory that is frequently allocated and freed will be cached, so the overhead of creating the same data structure(s) is reduced considerably. Also per-CPU set of caches (called Magazines) improve the scalability of libumem, by allowing it to have a far less contentious locking scheme when requesting memory from the system. Due to the object caching strategy outlined above, the application runs faster with lower lock contention among multiple threads.

libumem is a page based memory allocator. That means, if a request is made to allocate 20 bytes, libumem aligns it to the nearest page (ie., at 24 bytes on SPARC platform -- the default page size is 8K on Solaris/SPARC) and returns a pointer to the allocated block. As these requests add up, it can lead to internal fragmentation, so the extra memory that is not requested by application, but allocated by libumem is wasted. Also libumem uses 8 bytes of every buffer it creates, to keep meta data about that buffer. Due to the reasons outlined in this paragraph, there will be a slight increase in the per process memory footprint.

More interesting information about libumem can be found in the article Magazines and Vmem: Extending the Slab Allocator to Many CPUs and Arbitrary Resources.

libumem can also be used in catching memory management bugs like memory leaks, corrupted heap, in an application. Identifying Memory Management Bugs Within Applications Using the libumem Library article has the detailed steps to catch memory management bugs with lucid explanation/examples.

Quick tip:
Run "truss -c -p <pid>", and stop the data collection with Ctrl-c (^c) after some time say 60 sec. If you see more number of system calls to lwp_park, lwp_unpark, lwp_mutex_timedlock, it is an indication that the application is suffering from lock contention, and hence may not scale well. Consider linking your application with libumem library, or pre-load libumem during run-time, for better scalability.

Technorati tags
Solaris | OpenSolaris
Read More
Posted in | No comments

Tuesday, 14 March 2006

Solaris: DTrace script for getting call stacks

Posted on 21:19 by Unknown
The following DTrace script really helped me nailing down some lock contention issue, that I was looking into, at work. This simple script records all the call stacks, upto 60 frames, whenever a call has been made to lwp_*() API, explicitly or implicitly. At the end (ie., when we press ^C), it dumps all the stack traces along with the number of times the same call stack was executed. It also prints the duration (in seconds) for which the data was collected, and the IDs of active LWPs.
% cat lwp.d
#!/usr/sbin/dtrace -s

#pragma D option quiet

BEGIN
{
start = timestamp;
}

syscall:::entry
/execname == "execname"/
{
@s[probefunc] = count();
}

syscall::lwp_*:entry
/execname == "execname"/
{
@c[curthread->t_tid] = count();
@st[ustack(60)] = count();
}

END
{
printf("Ran for %d seconds\n\n", (timestamp - start) / 1000000000);

trunc(@s,5);
printa(@s);

printf("\n%-10s %-10s\n", "LWP ID", "COUNT");
printa("%-10d %@d\n", @c);

printa(@st);
}
This script can be easily modified to obtain the call stacks to any kind of function call, by replacing "lwp_*", with the actual function name. Also "execname" has to be replaced with the actual process name.

Technorati tags
Solaris | OpenSolaris | DTrace
Read More
Posted in | No comments

Friday, 3 March 2006

Solaris: Resource Controls - Physical Memory

Posted on 22:47 by Unknown
Solaris Zones: Resource Controls - CPU explains the steps to control the CPU resources on any server, running Solaris 10 or later. It is also possible to restrict the physical memory usage by a process, or by all processes owned by a user. This can be done either in a local zone or in a global zone on Solaris 10 and later. Note that Solaris 9 and later versions can be used for capping physical memory.

The goal of this blog entry is to show the simple steps in restricting the total physical memory utilization by all processes owned by an user called giri to 2G (total physical memory installed: 8G), in a local zone called v1280appserv.
 v1280appserv:/% prtconf | grep Mem
 prtconf: devinfo facility not available
 Memory size: 8192 Megabytes

To achieve the physical mem cap, we have to start with a project creation, for the user giri. A project is a grouping of processes that are subject to a set of constraints. To define the physical memory resource cap for a project, establish the physical memory cap by adding rcap.max-rss attribute to the newly created project. rcap.max-rss in a project indicates the total amount of physical memory, in bytes, that is available to all processes in the project. Project creation and establishing the physical memory cap steps can be combined into one simple step as shown below:
 % projadd -c "App Serv - Restrict the physical memory usage to 2G" -K "rcap.max-rss=2147483648" \
     -U giri appservproj
where: appservproj is the name of the project.

It will append an entry to /etc/project file.
 % cat /etc/project
 system:0::::
 user.root:1::::
 ...
 appservproj:100:App Serv - Restrict the physical memory usage to 2G:giri::rcap.max-rss=2147483648

-l option of projects can be used to list all the configured projects, and the detailed information about each project.
 % projects -l
 system
  projid : 0
  comment: ""
  users : (none)
  groups : (none)
  attribs:
 user.root
  projid : 1
  comment: ""
  users : (none)
  groups : (none)
  attribs:
 ...
 ...
 appservproj
  projid : 100
  comment: "App Serv - Restrict the physical memory usage to 2G"
  users : giri
  groups : (none)
  attribs: rcap.max-rss=2147483648

Now associate the project appservproj to user giri, by appending the following line to /etc/user_attr file:
        giri::::project=appservproj
 % cat /etc/user_attr
 ...
 adm::::profiles=Log Management
 lp::::profiles=Printer Management
 root::::auths=solaris.*,solaris.grant;profiles=Web Console Management,All;lock_after_retries=no
 giri::::project=appservproj

Finally enable the resource capping daemon, rcapd if it is not running. The rcapd daemon enforces resource caps on collections of processes. It supports per-project physical memory caps, as we need.
 % ps -ef | grep rcapd
  root 21160 21097 0 18:10:36 pts/4 0:00 grep rcapd

 % rcapadm -E

 % pgrep -l rcapd
 21164 rcapd

That's about it. When the resident set size (RSS) of a collection of processes owned by user giri, exceeds its cap, rcapd takes action and reduces the total RSS of the collection to 2G. The excess memory will be paged out to the swap device. The following run-time statistics indicate that the physical memory cap is effective -- observe the total RSS size under project appservproj; and also from the paging activity (vmstat output).
 % prstat -J
  PID USERNAME SIZE RSS STATE PRI NICE TIME CPU PROCESS/NLWP
  21584 giri 555M 381M sleep 59 0 0:01:19 7.4% siebmtshmw/73
  21580 giri 519M 391M sleep 59 0 0:01:16 5.7% siebmtshmw/73
  21576 giri 547M 372M sleep 59 0 0:01:19 5.7% siebmtshmw/73
  21591 giri 519M 372M sleep 59 0 0:01:14 3.5% siebmtshmw/75
  21565 giri 209M 119M sleep 59 0 0:00:16 0.4% siebprocmw/9
  21549 giri 5560K 3080K sleep 49 0 0:00:00 0.1% prstat/1
  21620 giri 4776K 3728K cpu1 59 0 0:00:00 0.1% prstat/1
  21564 giri 162M 111M sleep 59 0 0:00:07 0.1% siebmtsh/10
  ...
  ...

 PROJID NPROC SIZE RSS MEMORY TIME CPU PROJECT
  100 14 3232M 2052M 26% 0:06:20 23% appservproj
  3 8 62M 28M 0.3% 0:01:08 0.1% default

 Total: 22 processes, 396 lwps, load averages: 1.56, 1.07, 0.63

 % vmstat 2
  kthr memory page disk faults cpu
  r b w swap free re mf pi po fr de sr s0 s1 s3 -- in sy cs us sy id
  0 0 0 16985488 6003688 3 6 8 5 4 0 0 1 0 0 0 340 280 230 4 1 96
  0 0 0 14698304 3809408 38 556 6523 0 0 0 0 643 164 0 0 6075 4301 4899 78 12 10
  6 0 0 14691624 3792080 25 604 5922 0 0 0 0 573 168 0 0 5726 5451 3269 93 6 0
  11 0 0 14680984 3770464 360 831 6316 0 0 0 0 882 191 0 0 7276 4352 3010 75 11 15
  7 0 0 14670192 3765472 211 747 5725 0 0 0 0 865 178 0 0 7428 4349 3628 73 13 14
  13 0 0 14663552 3778280 8 300 1493 0 0 0 0 2793 101 0 0 16703 4485 2418 68 7 25
  14 0 0 14659352 3825832 12 154 983 0 0 0 0 3202 104 0 0 18664 4147 2208 56 4 40
  20 0 0 14650432 3865952 4 157 1009 0 0 0 0 3274 116 0 0 19295 4742 1984 70 6 25
  6 0 0 14644240 3909936 2 119 858 0 0 0 0 3130 81 0 0 18528 3691 2025 54 5 42
  18 0 0 14637752 3953560 1 121 662 0 0 0 0 3284 70 0 0 18475 5327 2297 95 5 0

rcapd daemon can be monitored with rcapstat tool.
 % rcapstat
  id project nproc vm rss cap at avgat pg avgpg
  ...
  ...
  100 appservproj 14 2603M 1962M 2048M 0K 0K 0K 0K
  100 appservproj 14 2637M 1996M 2048M 0K 0K 0K 0K
  100 appservproj 14 2645M 2005M 2048M 0K 0K 0K 0K
  100 appservproj 14 2686M 2042M 2048M 0K 0K 0K 0K
  100 appservproj 14 2706M 2063M 2048M 24K 0K 24K 0K
  id project nproc vm rss cap at avgat pg avgpg
  100 appservproj 14 2731M 2071M 2048M 61M 0K 38M 0K
  100 appservproj 14 2739M 2001M 2048M 0K 0K 0K 0K
  100 appservproj 14 2751M 2016M 2048M 0K 0K 0K 0K
  100 appservproj 14 2771M 2036M 2048M 0K 0K 0K 0K
  100 appservproj 14 2783M 2049M 2048M 880K 0K 744K 0K
  100 appservproj 14 2796M 2054M 2048M 15M 0K 6576K 0K
  100 appservproj 14 2824M 2030M 2048M 0K 0K 0K 0K
  100 appservproj 14 2832M 2047M 2048M 0K 0K 0K 0K
  100 appservproj 14 2875M 2090M 2048M 33M 0K 21M 0K
  100 appservproj 14 2895M 1957M 2048M 21M 0K 21M 0K
  100 appservproj 14 2913M 1982M 2048M 0K 0K 0K 0K
  100 appservproj 14 2951M 2040M 2048M 0K 0K 0K 0K
  100 appservproj 14 2983M 2081M 2048M 20M 0K 1064K 0K
  100 appservproj 14 2996M 2030M 2048M 55M 0K 33M 0K
  100 appservproj 14 3013M 2052M 2048M 4208K 0K 8184K 0K
  100 appservproj 14 3051M 2100M 2048M 52M 0K 56M 0K
  100 appservproj 14 3051M 2100M 2048M 0K 0K 0K 0K
  100 appservproj 14 3064M 2078M 2048M 30M 0K 36M 0K
  100 appservproj 14 3081M 2099M 2048M 51M 0K 56M 0K
  100 appservproj 14 3119M 2140M 2048M 52M 0K 48M 0K
  ...
  ...

 % rcapstat -g
  id project nproc vm rss cap at avgat pg avgpg
  100 appservproj 14 3368M 2146M 2048M 842M 0K 692M 0K
 physical memory utilization: 50% cap enforcement threshold: 0%
  100 appservproj 14 3368M 2146M 2048M 0K 0K 0K 0K
 physical memory utilization: 50% cap enforcement threshold: 0%
  100 appservproj 14 3368M 2146M 2048M 0K 0K 0K 0K
 physical memory utilization: 50% cap enforcement threshold: 0%
  100 appservproj 14 3380M 2096M 2048M 48M 0K 44M 0K
  ...

To disable rcapd daemon, run the following command:
 % rcapadm -D

For more information and examples, see:
  1. System Administration Guide: Solaris Containers-Resource Management and Solaris Zones
  2. Brenden Gregg's Memory Resource Control demos

Technorati tags
Solaris | OpenSolaris
Read More
Posted in | No comments

Tuesday, 28 February 2006

Solaris Zones: Resource Controls - CPU

Posted on 21:27 by Unknown
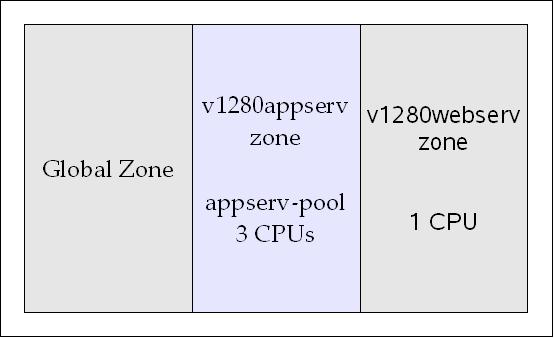
An overview of Solaris Zones is available in blog entry: Zone creation for dummies. It is possible to limit the resource utilization in each zone, with Solaris containers. Detailed information about the kind of resources that can be controlled, can be found in the Resource Controls chapter of Solaris Containers-Resource Management and Solaris Zones guide. The primary focus of this blog entry is to show how to restrict one of the zones to use a maximum of 3 CPUs, on a 4 CPU Sun server.

Let's assume that we have a server configured to run 3 zones (1 global + 2 local), as shown below:
 % zoneadm list -cv
  ID NAME STATUS PATH
  0 global running /
  19 v1280appserv running /zones/z1
  22 v1280webserv running /zones/z2

The assumption is that the application server running in v1280appserv zone is going to consume majority of CPU cycles. So to give a fair chance to run web server, and other applications on this server, let's try to restrict the non-global zone, v1280appserv, to use a maximum of 3 processors only, leaving one processor for the web server. This was shown in the following figure:


Steps for CPU resource control

1. Enable pools facility

Make sure the resource pool daemon, poold, is running.
 % ps -eaf | grep poold
  root 20019 18948 0 15:03:58 pts/3 0:00 grep poold

 % pooladm
 pooladm: couldn't open pools state file: Facility is not active

Use -e option of pooladm to enable the pools facility
 % pooladm -e
 % pgrep poold
 18951

Without any options, pooladm prints out the currently running pools configuration
 % pooladm
 system sdcv1280s001
  string system.comment
  int system.version 1
  boolean system.bind-default true
  int system.poold.pid 18951

  pool pool_default
  int pool.sys_id 0
  boolean pool.active true
  boolean pool.default true
  int pool.importance 1
  string pool.comment
  pset pset_default

  pset pset_default
  int pset.sys_id -1
  boolean pset.default true
  uint pset.min 1
  uint pset.max 65536
  string pset.units population
  uint pset.load 17
  uint pset.size 4
  string pset.comment

  cpu
  int cpu.sys_id 1
  string cpu.comment
  string cpu.status on-line

  cpu
  int cpu.sys_id 0
  string cpu.comment
  string cpu.status on-line

  cpu
  int cpu.sys_id 3
  string cpu.comment
  string cpu.status on-line

  cpu
  int cpu.sys_id 2
  string cpu.comment
  string cpu.status on-line

2. Configure & load pool into memory

Since the plan is to restrict v1280appserv zone to 3 processors, create an input file as shown below. This file will be used to configure the required resource pool using poolcfg.
 % cat zonepoolcfg
 create pset appserv-pset ( uint pset.min = 3; uint pset.max = 3 )
 create pool appserv-pool
 associate pool appserv-pool ( pset appserv-pset )

create pset appserv-pset ( uint pset.min = 3; uint pset.max = 3 ) creates a processor set with 3 processors
create pool appserv-pool creates a new pool called appserv-pool
associate pool appserv-pool ( pset appserv-pset ) associates the processor set appserv-pset with pool appserv-pool

Update the configuration using the zonepoolcfg input file.
 % poolcfg -f zonepoolcfg
 poolcfg: cannot load configuration from /etc/pooladm.conf: No such file or directory

Note that /etc/pooladm.conf file must exist before updating it. Use -s option of pooladm to save active configuration from memory in to /etc/pooladm.conf
 % pooladm -s
 % ls -l /etc/pooladm.conf
 -rw-rw-r-- 1 root root 1429 Feb 28 13:43 /etc/pooladm.conf

Now since the /etc/pooladm.conf exists, update it with the new pool configuration that we just created. This can be done with -f option of poolcfg -- it takes the input file as an argument.
 % poolcfg -f zonepoolcfg

Alternatively you can run the following commands instead of an input file, to update the configuration:
 % poolcfg -c 'create pset appserv-pset  ( uint pset.min = 3; uint pset.max = 3 )'
 % poolcfg -c 'create pool appserv-pool'
 % poolcfg -c 'associate pool appserv-pool ( pset appserv-pset )'

Next step is to instantiate (ie., activate) the configuration from /etc/pooladm.conf in to memory -- use -c option of pooladm to do this. It takes a file name as an argument; but if no file name is specified, it will read the configuration from /etc/pooladm.conf
 % pooladm -c
 % psrset
 user processor set 1: processors 0 1 2

Observe that one processor set is created with 3 processors in that set.

Check the current pool configuration one more time, with pooladm.
 % pooladm
 system sdcv1280s001
  string system.comment
  int system.version 1
  boolean system.bind-default true
  int system.poold.pid 18951

  pool appserv-pool
  int pool.sys_id 1
  boolean pool.active true
  boolean pool.default false
  int pool.importance 1
  string pool.comment
  pset appserv-pset

  ...
  ...

  pset appserv-pset
  int pset.sys_id 1
  boolean pset.default false
  uint pset.min 3
  uint pset.max 3
  string pset.units population
  uint pset.load 0
  uint pset.size 3
  string pset.comment

  cpu
  int cpu.sys_id 1
  string cpu.comment
  string cpu.status on-line

  cpu
  int cpu.sys_id 0
  string cpu.comment
  string cpu.status on-line

  cpu
  int cpu.sys_id 2
  string cpu.comment
  string cpu.status on-line

  ...
  ...

3. Configure the zone(s)

Since the v1280appserv zone is already created, we just need to connect the zone to the pool that we just created. Use zonecfg to update the zone configuration.
 % zonecfg -z v1280appserv
 zonecfg:v1280appserv> set pool=appserv-pool
 zonecfg:v1280appserv> verify
 zonecfg:v1280appserv> exit

If the zone is not created yet, follow the instructions of Zone creation for dummies, and specify the pool, when the zone is configured.

4. Reboot the zone

Simply reboot the zone, v1280appserv, so it binds to the newly created pool, when it comes back.
 % zlogin v1280appserv init 6
 % zoneadm list -cv
  ID NAME STATUS PATH
  0 global running /
  19 v1280appserv shutting_down /zones/z1
  22 v1280webserv running /zones/z2

 % zoneadm list -cv
  ID NAME STATUS PATH
  ...
  23 v1280appserv ready /zones/z1

 % zoneadm list -cv
  ID NAME STATUS PATH
  ...
  23 v1280appserv running /zones/z1

5. Connect & verify the resource utilization
 v1280appserv zone:

 v1280appserv:/% psrset
 user processor set 1: processors 0 1 2

 v1280appserv:/% psrinfo
 0 on-line since 01/19/2006 13:44:11
 1 on-line since 01/19/2006 13:44:12
 2 on-line since 01/19/2006 13:44:12

 v1280appserv:/%vmstat 2
  kthr memory page disk faults cpu
  r b w swap free re mf pi po fr de sr s0 s1 s3 -- in sy cs us sy id
  0 0 0 16964480 6000376 3 6 8 5 4 0 0 1 0 0 0 342 293 240 4 1 96
  0 0 0 15999272 5119352 0 25 4 0 0 0 0 0 2 0 0 875 2948 968 62 2 36
  0 0 0 15994448 5114792 23 105 0 0 0 0 0 13 2 0 0 620 1666 433 51 1 48
  0 0 0 15982504 5102680 33 182 0 0 0 0 0 0 6 0 0 702 2246 767 49 2 50
  0 0 0 15976104 5096336 0 14 0 0 0 0 0 0 0 0 0 575 1376 461 32 1 67
  0 0 0 15969896 5090152 0 8 0 0 0 0 0 0 0 0 0 472 1067 569 18 1 82
  0 0 0 15963296 5083672 0 38 0 0 0 0 0 0 0 0 0 685 2440 731 38 2 60

 v1280webserv zone:

 v1280webserv:/% psrset
 v1280webserv:/% psrinfo
 3 on-line since 01/19/2006 13:44:12

 v1280webserv:/%vmstat 2
  kthr memory page disk faults cpu
  r b w swap free re mf pi po fr de sr s0 s1 s3 -- in sy cs us sy id
  0 0 0 16964480 6000376 1 2 4 0 0 0 0 1 0 0 0 22 110 102 4 1 95
  0 0 0 16032976 5152368 0 21 8 0 0 0 0 0 1 0 0 99 1013 1239 13 4 83
  0 0 0 16024560 5143968 0 1 0 0 0 0 0 0 2 0 0 69 915 816 12 3 85
  0 0 0 16022272 5141744 0 1 0 0 0 0 0 0 2 0 0 41 738 715 7 2 90
  0 0 0 16011216 5130992 0 7 0 0 0 0 0 0 3 0 0 92 936 976 11 4 85
  0 0 0 16004560 5124480 0 4 0 0 0 0 0 0 3 0 0 44 768 726 6 2 92
  0 0 0 15999272 5119352 0 1 0 0 0 0 0 0 2 0 0 132 1196 1387 19 4 76

 Global Zone:

  PID USERNAME SIZE RSS STATE PRI NICE TIME CPU PROCESS/NLWP
  19844 giri 1007M 908M cpu2 59 0 0:04:49 16% siebmtshmw/154
  19859 giri 1007M 908M sleep 59 0 0:04:48 16% siebmtshmw/141
  19870 giri 999M 900M cpu0 59 0 0:04:38 16% siebmtshmw/145
  19906 giri 291M 127M run 29 10 0:01:27 4.3% webservd/417
  19907 giri 249M 85M run 59 0 0:00:22 1.2% webservd/158
  19976 giri 103M 63M sleep 32 0 0:00:01 1.1% siebmtshmw/7

 ZONEID NPROC SIZE RSS MEMORY TIME CPU ZONE
  23 54 4382M 3626M 45% 0:15:59 50% v1280appserv
  22 40 771M 320M 4.0% 0:05:40 5.5% v1280webserv
  0 37 355M 80M 1.0% 1:02:45 0.2% global

It is that simple.

Troubleshooting:

If you encounter the following error, double check your configuration.
        pooladm: configuration at '/etc/pooladm.conf' cannot be instantiated on current system
It is very likely that you configured some resource that is either not available or beyond its limits, on the system.

For more examples, see:
  1. [URL updated 05/28/08] Brendan Gregg's Zones documentation
  2. Sun's HOW-TO Guide: Solaris Containers: Consolidating Servers and Applications

Technorati tags
Solaris | OpenSolaris | Zones | Containers
Read More
Posted in | No comments

Friday, 17 February 2006

Solaris 10: Zone creation for dummies

Posted on 22:47 by Unknown
About Zones

In its simple form, a zone is a virtual operating system environment created within a single instance of the Solaris operating system. Efficient resource utilization is the main goal of this technology.

Solaris 10's zone partitioning technology can be used to create local zones that behave like virtual servers. All local zones are controlled from the system's global zone. Processes running in a zone are completely isolated from the rest of the system. This isolation prevents processes that are running in one zone from monitoring or affecting processes that are running in other zones. Note that processes running in a local zone can be monitored from global zone; but the processes running in a global zone or even in another local zone cannot be monitored from a local zone.

As of now, the upper limit for the number of zones that can be created/run on a system is 8192; of course, depending on the resource availability, a single system may or may not run all the configured zones effectively.

Global Zone

When we install Solaris 10, a global zone gets installed automatically; and the core operating system runs under global zone. To list all the configured zones, we can use zoneadm command:
 % zoneadm list -v
ID NAME STATUS PATH
0 global running /

Global zone is the only one:
  • bootable from the system hardware
  • to be used for system-wide administrative control, such as physical devices, routing, or dynamic reconfiguration (DR). ie., global zone is the only zone that is aware of all devices and all file systems
  • from which a non-global zone can be configured, installed, managed, or uninstalled. ie., global zone is the only zone that is aware of the existence of non-global (local) zones and their configurations. It is not possible to create local zones, within a local zone

Steps to create a Local Zone

Prerequisites:
  • Plenty of disk space to hold the newly installed zone. It needs at least 2G space to copy the essential files to the local zone, and of course the disk space needed by the application(s) you are planning to run, in this zone; and
  • A dedicated IP, for network connectivity

Basic Zone creation steps, with examples:
  1. Check the disk space & network configuration
     % df -h /
     Filesystem size used avail capacity Mounted on
     /dev/dsk/c1t1d0s0 29G 22G 7.1G 76% /

     % ifconfig -a
     lo0: flags=2001000849 mtu 8232 index 1
      inet 127.0.0.1 netmask ff000000
     eri0: flags=1000843 mtu 1500 index 2
      inet 192.168.74.217 netmask fffffe00 broadcast 192.168.75.255

  2. Since there is more than 5G free space, I've decided to install a local zone under /zones.
     % mkdir /zones

  3. Next step is to define/create the zone root. This is the path to zone's root directory that is relative to the global zone's root directory. Zone root must be owned by root user with the mode 700. This will be used in setting the zonepath property, during the zone creation process
     % cd /zones
     % mkdir appserver
     % chmod 700 appserver

     % ls -l
     total 2
     drwx------ 2 root root 512 Feb 17 12:46 appserver

  4. Create & configure a new 'sparse root' local zone, with root privileges
     % zonecfg -z appserv
     appserv: No such zone configured
     Use 'create' to begin configuring a new zone.
     zonecfg:appserv> create
     zonecfg:appserv> set zonepath=/zones/appserver
     zonecfg:appserv> set autoboot=true
     zonecfg:appserv> add net
     zonecfg:appserv:net> set physical=eri0
     zonecfg:appserv:net> set address=192.168.175.126
     zonecfg:appserv:net> end
     zonecfg:appserv> add fs
     zonecfg:appserv:fs> set dir=/repo2
     zonecfg:appserv:fs> set special=/dev/dsk/c2t40d1s6
     zonecfg:appserv:fs> set raw=/dev/rdsk/c2t40d1s6
     zonecfg:appserv:fs> set type=ufs
     zonecfg:appserv:fs> set options noforcedirectio
     zonecfg:appserv:fs> end
     zonecfg:appserv> add inherit-pkg-dir
     zonecfg:appserv:inherit-pkg-dir> set dir=/opt/csw
     zonecfg:appserv:inherit-pkg-dir> end
     zonecfg:appserv> info
     zonepath: /zones/appserver
     autoboot: true
     pool:
     inherit-pkg-dir:
      dir: /lib
     inherit-pkg-dir:
      dir: /platform
     inherit-pkg-dir:
      dir: /sbin
     inherit-pkg-dir:
      dir: /usr
     inherit-pkg-dir:
      dir: /opt/csw
     net:
      address: 192.168.175.126
      physical: eri0
     zonecfg:appserv> verify
     zonecfg:appserv> commit
     zonecfg:appserv> exit

    Sparse Root Zone Vs Whole Root Zone(Updated 05/07/2008)

    In a Sparse Root Zone, the directories /usr, /sbin, /lib and /platform will be mounted as loopback file systems. That is, although all those directories appear as normal directories under the sparse root zone, they will be mounted as read-only file systems. Any change to those directories in the global zone can be seen from the sparse root zone.

    However if you need the ability to write into any of those directories listed above, you may need to configure a Whole Root Zone. For example, softwares like ClearCase need write permissions to /usr directory. In that case configuring a Whole Root Zone is the way to go. The steps for creating and configuring a new 'Whole Root' local zone are as follows:
     % zonecfg -z appserv
     appserv: No such zone configured
     Use 'create' to begin configuring a new zone.
     zonecfg:appserv> create
     zonecfg:appserv> set zonepath=/zones/appserver
     zonecfg:appserv> set autoboot=true
     zonecfg:appserv> add net
     zonecfg:appserv:net> set physical=eri0
     zonecfg:appserv:net> set address=192.168.175.126
     zonecfg:appserv:net> end
     zonecfg:appserv> add inherit-pkg-dir
     zonecfg:appserv:inherit-pkg-dir> set dir=/opt/csw
     zonecfg:appserv:inherit-pkg-dir> end
     zonecfg:appserv> remove inherit-pkg-dir dir=/usr
     zonecfg:appserv> remove inherit-pkg-dir dir=/sbin
     zonecfg:appserv> remove inherit-pkg-dir dir=/lib
     zonecfg:appserv> remove inherit-pkg-dir dir=/platform
     zonecfg:appserv> info
     zonepath: /zones/appserver
     autoboot: true
     pool:
     inherit-pkg-dir:
      dir: /opt/csw
     net:
      address: 192.168.175.126
      physical: eri0
     zonecfg:appserv> verify
     zonecfg:appserv> commit
     zonecfg:appserv> exit

    Brief explanation of the properties that I added:

    zonepath=/zones/appserver
    Local zone's root directory, relative to global zone's root directory. ie., local zone will have all the bin, lib, usr, dev, net, etc, var, opt etc., directories physically under /zones/appserver directory

    autoboot=true
    boot this zone automatically when the global zone is booted

    physical=eri0
    eri0 card is used for the physical interface

    address=192.168.175.126
    192.168.175.126 is the IP address. It must have all necessary DNS entries

    [Added 08/25/08] The whole add fs section adds the file system to the zone. In this example, the file system that is being exported to the zone is an existing UFS file system.

    set dir=/repo2
    /repo2 is the mount point in the local zone

    set special=/dev/dsk/c2t40d1s6
    set raw=/dev/rdsk/c2t40d1s6

    Grant access to the block (/dev/dsk/c2t40d1s6) and raw (/dev/rdsk/c2t40d1s6) devices so the file system can be mounted in the non-global zone. Make sure the block device is not mounted anywhere right before installing the non-global zone. Otherwise, the zone installation may fail with ERROR: file system check </usr/lib/fs/ufs/fsck> of </dev/rdsk/c2t40d1s6> failed: exit status <33>: run fsck manually. In that case, unmount the file system that is being exported, uninstall the partially installed zone (zoneadm -z <zone> uninstall) then install the zone from the scratch (no need to re-configure the zone, just do a re-install).

    set type=ufs
    The file system is of type UFS

    set options noforcedirectio
    Mount the file system with the option noforcedirectio[/Added 08/25/08]

    dir=/opt/csw
    read-only path, will be lofs'd (loop back mounted) from global zone. Note: it works for sparse root zone only -- whole root zone cannot have any shared file systems

    zonecfg commands verify and commit, verifies and commits the zone configuration for the zone, respectively. Note that it is not necessary to commit the zone configuration; it will be done automatically when we exit from zonecfg tool. info displays information about the current configuration

  5. Check the state of the newly created/configured zone
     % zoneadm list -cv
      ID NAME STATUS PATH
      0 global running /
      - appserv configured /zones/appserver

  6. Next step is to install the configured zone. It takes a while to install the necessary packages
     % zoneadm -z appserv install
     /zones must not be group writable.
     could not verify zonepath /zones/appserver because of the above errors.
     zoneadm: zone appserv failed to verify

     % ls -ld /zones
     drwxrwxr-x 3 root root 512 Feb 17 12:46 /zones
    Since /zones must not be group writable, let's change the mode to 700.
     % chmod 700 /zones

     % ls -ld /zones
     drwx------ 3 root root 512 Feb 17 12:46 /zones

     % zoneadm -z appserv install
     Preparing to install zone .
     Creating list of files to copy from the global zone.
     Copying <2658> files to the zone.
     Initializing zone product registry.
     Determining zone package initialization order.
     Preparing to initialize <1128> packages on the zone.
     Initialized <1128> packages on zone.
     Zone is initialized.
     Installation of these packages generated errors:
     Installation of <2> packages was skipped.
     Installation of these packages generated warnings: <CSWbdb3 CSWtcpwrap
      CSWreadline CSWlibnet CSWlibpcap CSWjpeg CSWzlib CSWcommon CSWpkgget SMCethr CSWxpm
      SMClsof SMClibgcc SMCossld OpenSSH SMCtar SUNWj3dmx CSWexpat CSWftype2 CSWfconfig
      CSWiconv CSWggettext CSWlibatk CSWpango CSWpng CSWtiff CSWgtk2 CSWpcre CSWlibmm
      CSWgsed CSWlibtool CSWncurses CSWunixodbc CSWoldap CSWt1lib CSWlibxml2 CSWbzip2
      CSWlibidn CSWphp>
     The file contains a log of the zone installation.

  7. Verify the state of the appserv zone, one more time
     % zoneadm list -cv
      ID NAME STATUS PATH
      0 global running /
      - appserv installed /zones/appserver

  8. Boot up the appserv zone. Let's note down the ifconfig output to see how it changes after the local zone boots up. Also observe that there is no answer from the server yet, since it is not up
     % ping 192.168.175.126
     no answer from 192.168.175.126

     % ifconfig -a
     lo0: flags=2001000849 mtu 8232 index 1
      inet 127.0.0.1 netmask ff000000
     eri0: flags=1000843 mtu 1500 index 2
      inet 192.168.74.217 netmask fffffe00 broadcast 192.168.75.255
      ether 0:3:ba:2d:0:84

     % zoneadm -z appserv boot
     zoneadm: zone 'appserv': WARNING: eri0:1: no matching subnet found in netmasks(4) for 192.168.175.126;
     using default of 255.255.0.0.

     % zoneadm list -cv
      ID NAME STATUS PATH
      0 global running /
      1 appserv running /zones/appserver

     % ping 192.168.175.126
     192.168.175.126 is alive

     % ifconfig -a
     lo0: flags=2001000849 mtu 8232 index 1
      inet 127.0.0.1 netmask ff000000
     lo0:1: flags=2001000849 mtu 8232 index 1
      zone appserv
      inet 127.0.0.1 netmask ff000000
     eri0: flags=1000843 mtu 1500 index 2
      inet 192.168.74.217 netmask fffffe00 broadcast 192.168.75.255
      ether 0:3:ba:2d:0:84
     eri0:1: flags=1000843 mtu 1500 index 2
      zone appserv
      inet 192.168.175.126 netmask ffff0000 broadcast 192.168.255.255
    Observe that the zone appserv has it's own virtual instance of lo0, the system's loopback interface and the zone's IP address is also being served by the eri0 network interface

  9. Login to the Zone {console} and performing the internal zone configuration. zlogin utility can be used to enter a zone. The first time we log in to the console, we get a chance to answer a series of questions for the desired zone configuraton. -C option of zlogin can be used to log in to the Zone console.
     % zlogin -C -e [ appserv
     [Connected to zone 'appserv' console]

     Select a Language

      0. English
      1. es
      2. fr

     Please make a choice (0 - 2), or press h or ? for help: 0

     Select a Locale

      0. English (C - 7-bit ASCII)
      1. Canada (English) (UTF-8)
      2. Canada-English (ISO8859-1)
      3. U.S.A. (UTF-8)
      4. U.S.A. (en_US.ISO8859-1)
      5. U.S.A. (en_US.ISO8859-15)
      6. Go Back to Previous Screen

     Please make a choice (0 - 6), or press h or ? for help: 0

     ...

      Enter the host name which identifies this system on the network. The name
      must be unique within your domain; creating a duplicate host name will cause
      problems on the network after you install Solaris.

      A host name must have at least one character; it can contain letters,
      digits, and minus signs (-).

      Host name for eri0:1 appserv v440appserv

     ...
     ...

     System identification is completed.
     ...

     rebooting system due to change(s) in /etc/default/init

     [NOTICE: Zone rebooting]

     SunOS Release 5.11 Version snv_23 64-bit
     Copyright 1983-2005 Sun Microsystems, Inc. All rights reserved.
     Use is subject to license terms.
     Hostname: v440appserv

     v440appserv console login: root
     Password:
     Feb 17 15:15:30 v440appserv login: ROOT LOGIN /dev/console
     Sun Microsystems Inc. SunOS 5.11 snv_23 October 2007

     %

That is all there is in the creation of a local zone. Now simply login to the newly created zone, just like connecting to any other system in the network.

[New 08/27/2008] Mounting file systems in a non-global zone

Sometimes it might be necessary to export file systems or create new file systems when the zone is already running. This section's focus is on exporting block devices and the raw devices in such situations i.e., when the local zone is already configured.

Exporting the Raw Device(s) to a non-global zone

If the file system does not exist on the device, raw devices can be exported as they are, so the file system can be created inside the non-global zone using the normal newfs command.

The following example shows how to export the raw device to a non-global zone when the zone is already configured.

# zonecfg -z appserv
zonecfg:appserv> add device
zonecfg:appserv:device> set match=/dev/rdsk/c5t0d0s6
zonecfg:appserv:device> end
zonecfg:appserv> verify
zonecfg:appserv> commit
zonecfg:appserv> exit


In this example /dev/rdsk/c5t0d0s6 is being exported.

After the zonecfg step, reboot the non-global zone to make the raw device visible inside the non-global zone. After the reboot, check the existence of the raw device.

# hostname
v440appserv

# ls -l /dev/rdsk/c5t0d0s6
crw-r----- 1 root sys 118, 126 Aug 27 14:33 /dev/rdsk/c5t0d0s6


Now that the raw device is accessible within the non-global zone, we can use the regular Solaris commands to create any file system like UFS.

eg.,
# newfs -v c5t0d0s6
newfs: construct a new file system /dev/rdsk/c5t0d0s6: (y/n)? y
mkfs -F ufs /dev/rdsk/c5t0d0s6 1140260864 -1 -1 8192 1024 251 1 120 8192 t 0 -1 8 128 n
Warning: 4096 sector(s) in last cylinder unallocated
/dev/rdsk/c5t0d0s6: 1140260864 sectors in 185590 cylinders of 48 tracks, 128 sectors
556768.0MB in 11600 cyl groups (16 c/g, 48.00MB/g, 5824 i/g)
super-block backups (for fsck -F ufs -o b=#) at:
32, 98464, 196896, 295328, 393760, 492192, 590624, 689056, 787488, 885920,
Initializing cylinder groups:
...............................................................................
...............................................................................
.........................................................................
super-block backups for last 10 cylinder groups at:
1139344160, 1139442592, 1139541024, 1139639456, 1139737888, 1139836320,
1139934752, 1140033184, 1140131616, 1140230048


Exporting the Block Device(s) to a non-global zone

If the file system exists on the device, block devices can be exported as they are, so the file system can be mounted inside the non-global zone using the normal Solaris command, mount.

The following example shows how to export the block device to a non-global zone when the zone is already configured.

# zonecfg -z appserv
zonecfg:appserv> add device
zonecfg:appserv:device> set match=/dev/dsk/c5t0d0s6
zonecfg:appserv:device> end
zonecfg:appserv> verify
zonecfg:appserv> commit
zonecfg:appserv> exit


In this example /dev/dsk/c5t0d0s6 is being exported.

After the zonecfg step, reboot the non-global zone to make the block device visible inside the non-global zone. After the reboot, check the existence of the block device; and mount the file system within the non-global zone.

# hostname
v440appserv

# ls -l /dev/dsk/c5t0d0s6
brw-r----- 1 root sys 118, 126 Aug 27 14:40 /dev/dsk/c5t0d0s6

# fstyp /dev/dsk/c5t0d0s6
ufs

# mount /dev/dsk/c5t0d0s6 /mnt

# df -h /mnt
Filesystem size used avail capacity Mounted on
/dev/dsk/c5t0d0s6 535G 64M 530G 1% /mnt


Mounting a file system from the global zone into the non-global zone

Sometimes it is desirable to have the flexibility of mounting a file system in the global zone or non-global zone on-demand. In such situations, rather than exporting the file systems or block devices into the non-global zone, create the file system in the global zone and mount the file system directly from the global zone into the non-global zone. Make sure to unmount that file system in the global zone if mounted, before attempting to mount it in the non-global zone.

eg.,
In the non-global zone:
# mkdir /repo1


In the global zone:
# df -h /repo1
/dev/dsk/c2t40d0s6 134G 64M 133G 1% /repo1

# umount /repo1

# ls -ld /zones/appserv/root/repo1
drwxr-xr-x 2 root root 512 Aug 27 14:45 /zones/appserv/root/repo1

# mount /dev/dsk/c2t40d0s6 /zones/appserv/root/repo1


Now go back to the non-global zone and check the mounted file systems.

# hostname
v440appserv

# df -h /repo1
Filesystem size used avail capacity Mounted on
/repo1 134G 64M 133G 1% /repo1


To unmount the file system from the non-global zone, run the following command from the global zone.
# umount /zones/appserv/root/repo1


Removing the file system from the non-global zone

eg.,
Earlier in the zone creation step, the block device /dev/dsk/c2t40d1s6 was exported and mounted on the mount point /repo2 inside the non-global zone. To remove the file system completely from the non-global zone, run the following in the global zone.
# zonecfg -z appserv
zonecfg:appserv> remove fs dir=/repo2
zonecfg:appserv> verify
zonecfg:appserv> commit
zonecfg:appserv> exit


Reboot the non-global zone for this setting to take effect.
[New: 08/27/2008]

Shutting down and booting up the local zones (Updated 01/15/2008)
  1. To bring down the local zone:
     % zlogin appserv shutdown -i 0

  2. To boot up the local zone:
     % zoneadm -z appserv boot

Just for the sake of completeness, the following steps show how to remove a local zone.

Steps to delete a Local Zone
  1. Shutdown the local zone
     % zoneadm -z appserv halt

     % zoneadm list -cv
      ID NAME STATUS PATH
      0 global running /
      - appserv installed /zones/appserver

  2. Uninstall the local zone -- remove the root file system
     % zoneadm -z appserv uninstall
     Are you sure you want to uninstall zone appserv (y/[n])? y

      zoneadm list -cv
      ID NAME STATUS PATH
      0 global running /
      - appserv configured /zones/appserver

  3. Delete the configured local zone
     % zonecfg -z appserv delete
     Are you sure you want to delete zone appserv (y/[n])? y

      zoneadm list -cv
      ID NAME STATUS PATH
      0 global running /


[New: 07/14/2009]
Cloning a Non-Global Zone

The following instructions are for cloning a non-global zone on the same system. The example shown below clones the siebeldb zone. After the cloning process, a brand new zone oraclebi emerges as a replica of siebeldb zone.

eg.,
# zoneadm list -cv
ID NAME STATUS PATH BRAND IP
0 global running / native shared
- siebeldb installed /zones/dbserver native excl

  1. Export the configuration of the zone that you want to clone/copy

    # zonecfg -z siebeldb export > /tmp/siebeldb.config.cfg


  2. Change the configuration of the new zone that differ from the existing one -- for example, IP address, data set names, network interface etc. To make these changes, edit /tmp/siebeldb.config.cfg

  3. Create the zone root directory for the new zone being created

    # mkdir /zones3/oraclebi
    # chmod 700 /zones3/oraclebi
    # ls -ld /zones3/oraclebi
    drwx------ 2 root root 512 Mar 12 15:41 /zones3/oraclebi

  4. Create a new (empty, non-configured) zone in the usual manner with the edited configuration file as an input
    # zonecfg -z oraclebi -f /tmp/siebeldb.config.cfg

    # zoneadm list -cv
    ID NAME STATUS PATH BRAND IP
    0 global running / native shared
    - siebeldb installed /zones/dbserver native excl
    - oraclebi configured /zones3/oraclebi native excl

  5. Ensure that the zone you intend to clone/copy is not running
    # zoneadm -z siebeldb halt

  6. Clone the existing zone
    # zoneadm -z oraclebi clone siebeldb
    Cloning zonepath /zones/dbserver...

    This step takes at least 5 minutes to clone the whole zone. Larger zones may take longer to complete the cloning process.

  7. Boot the newly created zone
    # zoneadm -z oraclebi boot

    Bring up the halted zone (the source zone) as well, if wish.

  8. Login to the console of the new zone to configure IP, networking, etc., and you are done.
    # zlogin -C oraclebi


[New: 07/15/2009]
Migrating a Non-Global Zone from One Host to Another

Keywords: Solaris, Non-Global Zone, Migration, Attach, Detach

The following instructions demonstrate how to migrate the non-global zone, orabi to another server with examples.
# zoneadm list -cv
ID NAME STATUS PATH BRAND IP
0 global running / native shared
4 siebeldb running /zones/dbserver native excl
- orabi installed /zones3/orabi native shared

  1. Halt the zone to be migrated, if running
    # zoneadm -z orabi halt

  2. Detach the zone. Once detached, it will be in the configured state
    # zoneadm -z orabi detach

    # zoneadm list -cv
    ID NAME STATUS PATH BRAND IP
    0 global running / native shared
    4 siebeldb running /zones/dbserver native excl
    - orabi configured /zones3/orabi native shared

  3. Move the zonepath for the zone to be migrated from the old host to the new host.

    Do the following on the old host:
    # cd /zones3
    # tar -Ecf orabi.tar orabi
    # compress orabi.tar

    # sftp newhost
    Connecting to newhost...
    sftp> cd /zones3
    sftp> put orabi.tar.Z
    Uploading orabi.tar.Z to /zones3/orabi.tar.Z
    sftp> quit

    On the newhost:
    # cd /zones3
    # uncompress orabi.tar.Z
    # tar xf orabi.tar

  4. On the new host, configure the zone.

    Create the equivalent zone orabi on the new host -- use the zonecfg command with the -a option and the zonepath on the new host. Make any required adjustments to the configuration and commit the configuration.
    # zonecfg -z orabi
    orabi: No such zone configured
    Use 'create' to begin configuring a new zone.
    zonecfg:orabi> create -a /zones3/orabi
    zonecfg:orabi> info
    zonename: orabi
    zonepath: /zones3/orabi
    brand: native
    autoboot: false
    bootargs:
    pool:
    limitpriv: all,!sys_suser_compat,!sys_res_config,!sys_net_config,!sys_linkdir,!sys_devices,!sys_config,!proc_zone,!dtrace_kernel,!sys_ip_config
    scheduling-class:
    ip-type: shared
    inherit-pkg-dir:
    dir: /lib
    inherit-pkg-dir:
    dir: /platform
    inherit-pkg-dir:
    dir: /sbin
    inherit-pkg-dir:
    dir: /usr
    net:
    address: IPaddress
    physical: nxge1
    defrouter not specified
    zonecfg:orabi> set capped-memory
    zonecfg:orabi:capped-memory> set physical=8G
    zonecfg:orabi:capped-memory> end
    zonecfg:orabi> commit
    zonecfg:orabi> exit

  5. Attach the zone on the new host with a validation check and update the zone to match a host running later versions of the dependent packages
    # ls -ld /zones3
    drwxrwxrwx 5 root root 512 Jul 15 12:30 /zones3
    # chmod g-w,o-w /zones3
    # ls -ld /zones3
    drwxr-xr-x 5 root root 512 Jul 15 12:30 /zones3

    # zoneadm -z orabi attach -u
    Getting the list of files to remove
    Removing 1740 files
    Remove 607 of 607 packages
    Installing 1878 files
    Add 627 of 627 packages
    Updating editable files
    The file within the zone contains a log of the zone update.

    # zoneadm list -cv
    ID NAME STATUS PATH BRAND IP
    0 global running / native shared
    - orabi installed /zones3/orabi native shared

    Note:
    It is possible to force the attach operation without performing the validation. You can do so with the help of -F option
    # zoneadm -z orabi attach -F

    Be careful when using this option because it could lead to an incorrect configuration; and an incorrect configuration could result in undefined behavior


[New: 07/19/2009]
Tip: How to find out whether connected to the primary OS instance or the virtual instance?

If the command zonename returns global, then you are connected to the OS instance that was booted from the physical hardware. If you see any string other than global, you might have connected to the virtual OS instance.

Alternatively try running prstat -Z or zoneadm list -cv commands. If you see exactly one non-zero Zone ID, it is an indication that you are connected to a non-global zone.

Suggested reading:
  • System Administration Guide: Solaris Containers-Resource Management and Solaris Zones
  • Zones and Containers FAQ at opensolaris.org
  • Zones : Unofficial FAQ

Technorati tags
Solaris | OpenSolaris | Zones
Read More
Posted in | No comments
Newer Posts Older Posts Home
Subscribe to: Posts (Atom)

Popular Posts

  • UNIX/Linux: File Permissions (chmod)
    A file's permissions are also known as its 'mode'; so to change them we need to use the 'chmod' command (change mode). T...
  • C/C++/Java: ++ unary operator
    #include <stdio.h> int main() { int i = 5, j = 5; int total = 0; total = ++i + j++; printf("\ntotal o...
  • C++: Virtual Function
    A virtual function allows derived classes to replace the implementation provided by the base class. The compiler makes sure the replacemen...
  • Achievement Award
    Got an Achievement Award/Certificate from Sun Microsystems, in recognition for my effort with Siebel Benchmark!! =:) Related post: http:...
  • C/C++: Structure Vs Union
    A structure is a collection of items of different types; and each data item will have its own memory location. Where as only one item withi...
  • Database: Oracle Server Architecture (overview)
    Oracle server consists of the following core components: 1) database(s) & 2) instance(s) 1) database consists of: 1) datafil...
  • Solaris/C/C++: Benefit(s) of Linker (symbol) Scoping
    Introduction By default, the static linker (ld) makes all ELF symbols global in scope. This means it puts the symbols into the dynamic symbo...
  • Linux: Frozen Xwindows
    If Xwindows seem frozen, the following simple key strokes may bring back the Xserver without the need for a reboot Two ways to kill the Xwi...
  • PHP: Memory savings with mysqlnd
    mysqlnd may save memory. In the best cases, it may consume only 50% memory as that of libmysql esp. when the client application does not mod...
  • Blast from the Past : The Weekend Playlist #3
    The 80s contd., The 80s witnessed the rise of fine talent - so, it is only fitting to dedicate another complete playlist for the 80s. Her...

Categories

  • 80s music playlist
  • bandwidth iperf network solaris
  • best
  • black friday
  • breakdown database groups locality oracle pmap sga solaris
  • buy
  • deal
  • ebiz ebs hrms oracle payroll
  • emca oracle rdbms database ORA-01034
  • friday
  • Garmin
  • generic+discussion software installer
  • GPS
  • how-to solaris mmap
  • impdp ora-01089 oracle rdbms solaris tips upgrade workarounds zombie
  • Magellan
  • music
  • Navigation
  • OATS Oracle
  • Oracle Business+Intelligence Analytics Solaris SPARC T4
  • oracle database flashback FDA
  • Oracle Database RDBMS Redo Flash+Storage
  • oracle database solaris
  • oracle database solaris resource manager virtualization consolidation
  • Oracle EBS E-Business+Suite SPARC SuperCluster Optimized+Solution
  • Oracle EBS E-Business+Suite Workaround Tip
  • oracle lob bfile blob securefile rdbms database tips performance clob
  • oracle obiee analytics presentation+services
  • Oracle OID LDAP ADS
  • Oracle OID LDAP SPARC T5 T5-2 Benchmark
  • oracle pls-00201 dbms_system
  • oracle siebel CRM SCBroker load+balancing
  • Oracle Siebel Sun SPARC T4 Benchmark
  • Oracle Siebel Sun SPARC T5 Benchmark T5-2
  • Oracle Solaris
  • Oracle Solaris Database RDBMS Redo Flash F40 AWR
  • oracle solaris rpc statd RPC troubleshooting
  • oracle solaris svm solaris+volume+manager
  • Oracle Solaris Tips
  • oracle+solaris
  • RDC
  • sale
  • Smartphone Samsung Galaxy S2 Phone+Shutter Tip Android ICS
  • solaris oracle database fmw weblogic java dfw
  • SuperCluster Oracle Database RDBMS RAC Solaris Zones
  • tee
  • thanksgiving sale
  • tips
  • TomTom
  • windows

Blog Archive

  • ▼  2013 (16)
    • ▼  December (3)
      • Blast from the Past : The Weekend Playlist #3
      • Measuring Network Bandwidth Using iperf
      • Blast from the Past : The Weekend Playlist #2
    • ►  November (2)
    • ►  October (1)
    • ►  September (1)
    • ►  August (1)
    • ►  July (1)
    • ►  June (1)
    • ►  May (1)
    • ►  April (1)
    • ►  March (1)
    • ►  February (2)
    • ►  January (1)
  • ►  2012 (14)
    • ►  December (1)
    • ►  November (1)
    • ►  October (1)
    • ►  September (1)
    • ►  August (1)
    • ►  July (1)
    • ►  June (2)
    • ►  May (1)
    • ►  April (1)
    • ►  March (1)
    • ►  February (1)
    • ►  January (2)
  • ►  2011 (15)
    • ►  December (2)
    • ►  November (1)
    • ►  October (2)
    • ►  September (1)
    • ►  August (2)
    • ►  July (1)
    • ►  May (2)
    • ►  April (1)
    • ►  March (1)
    • ►  February (1)
    • ►  January (1)
  • ►  2010 (19)
    • ►  December (3)
    • ►  November (1)
    • ►  October (2)
    • ►  September (1)
    • ►  August (1)
    • ►  July (1)
    • ►  June (1)
    • ►  May (5)
    • ►  April (1)
    • ►  March (1)
    • ►  February (1)
    • ►  January (1)
  • ►  2009 (25)
    • ►  December (1)
    • ►  November (2)
    • ►  October (1)
    • ►  September (1)
    • ►  August (2)
    • ►  July (2)
    • ►  June (1)
    • ►  May (2)
    • ►  April (3)
    • ►  March (1)
    • ►  February (5)
    • ►  January (4)
  • ►  2008 (34)
    • ►  December (2)
    • ►  November (2)
    • ►  October (2)
    • ►  September (1)
    • ►  August (4)
    • ►  July (2)
    • ►  June (3)
    • ►  May (3)
    • ►  April (2)
    • ►  March (5)
    • ►  February (4)
    • ►  January (4)
  • ►  2007 (33)
    • ►  December (2)
    • ►  November (4)
    • ►  October (2)
    • ►  September (5)
    • ►  August (3)
    • ►  June (2)
    • ►  May (3)
    • ►  April (5)
    • ►  March (3)
    • ►  February (1)
    • ►  January (3)
  • ►  2006 (40)
    • ►  December (2)
    • ►  November (6)
    • ►  October (2)
    • ►  September (2)
    • ►  August (1)
    • ►  July (2)
    • ►  June (2)
    • ►  May (4)
    • ►  April (5)
    • ►  March (5)
    • ►  February (3)
    • ►  January (6)
  • ►  2005 (72)
    • ►  December (5)
    • ►  November (2)
    • ►  October (6)
    • ►  September (5)
    • ►  August (5)
    • ►  July (10)
    • ►  June (8)
    • ►  May (9)
    • ►  April (6)
    • ►  March (6)
    • ►  February (5)
    • ►  January (5)
  • ►  2004 (36)
    • ►  December (1)
    • ►  November (5)
    • ►  October (12)
    • ►  September (18)
Powered by Blogger.

About Me

Unknown
View my complete profile